-
YAHMS: Revisited, Upgrading to XBee with Wire Antenna
A good few months ago I blogged about my YAHMS project and my YAHMS Base Station. It was a funny time to get the project complete, just in time for the summer, but it has ended up being useful. Being able to turn the hall light on when we come home in the dark is really useful and, with the summer we’ve had, the heating has gone on from time to time too.
It hasn’t been without its problems, though fortunately they have been relatively few. Power ended up being an issue for the temperature probes, using four AA batteries would keep the probes running for about a week. This isn’t bad but would mean replacing them regularly, also when the voltage went low, the voltage detector didn’t seem to work and I would see rising temperatures. In the end I decided to use some wall wart power supplies, unfortunately that means the probes are less portable and also means that half of the circuit was unnecessary, as the wall warts never provide a low voltage.
I’ve also had problems with the Base Station falling off the network after around 5-7 days of use. There was originally a problem with the DHCP lease expiring so I made some changes to make it re-request the lease when it was near to expiring. This didn’t entirely fix the problem so to be sure I switched to a fixed IP. This led to the 5-7 day uptime, I’m not really sure what is happening here, I’m guessing some memory usage problem whereby there are not enough resources left to create a new Client object but I haven’t been able to track it down. When the problem occurs the system still manages to turn the heating on and off at the right times so it isn’t entirely useless, but it does become unresponsive to new settings and won’t send back data either.
Final problem, and the one I’m going to fix today, is that the XBee modules sometimes have issues transmitting data to the base station. I originally wanted to have one upstairs but couldn’t get that to work at all. I ended up putting that one in the conservatory to get “outside” temperatures but it still has issues quite often and has to be positioned right by the door to even sometimes work.
A few months ago I was approached by someone from Farnell who wanted to know if I would like to receive hardware to review on my blog. The arrangement is that they will send me hardware in exchange for a review on my blog and a link to the product on their website. So, here goes…
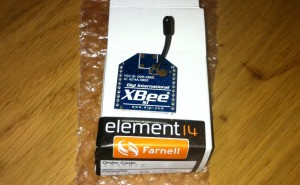
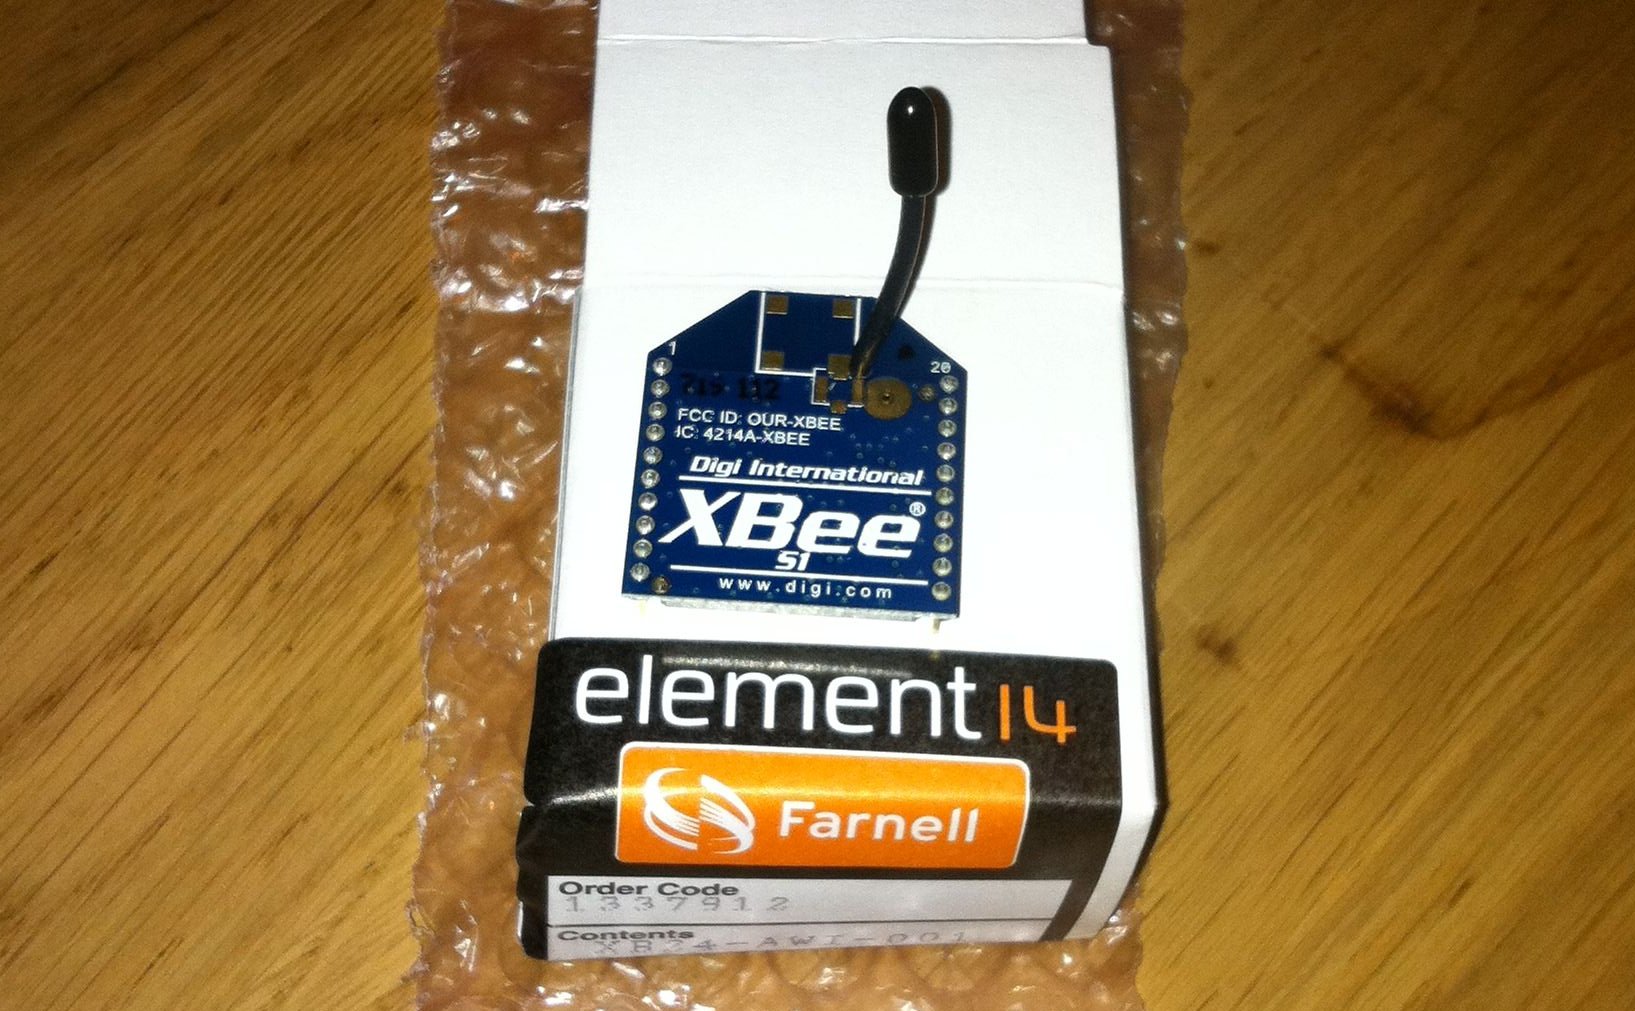
XBee Wire Antenna Module (Series 1)
Previously I’ve used the chip antenna versions of the XBee series one modules. These were great and really simple to work with but when I tried to use them in a network around my house I had real issues trying to get the signal to pass through walls and ceilings/floors. The best solution would likely be to replace all of the XBee modules with alternatives with better antennas or with more powerful radios. To replace all of the modules would be quite expensive so I’ve decided to go with replacing just the module on the base station and hope that it does a better job of receiving the signals sent out by the other modules. This may be foolish but I’ll give it a go and see what happens.
To replace the module should be a pretty simple job, it’s the same format as the chip antenna module so physically I just have to switch it out for the new one. Before I can do that though requires that I send some settings to the XBee to configure its ID and PAN ID as mentioned in my post about the temperature probes. To communicate with the Xbee I’m just going to use an Arduino Uno and wire the Din/Dout pins on the XBee to the RX/TX pins on the Arduino. I then load a blank sketch onto the Arduino and use the Serial Monitor to communicate with the XBee. What I’ll be sending to it is:
ATMY=0,ID=1234Which broken down means:
-
AT _ - Attention!_
-
MY=0, _ - the ID of this unit_
-
ID=1234, _ - the PAN ID for the network of XBees_
To send those settings open your Arduino software, choose the right serial port in Tools -> Serial Port then open the serial monitor with Tools -> Serial Monitor. Choose to send no line endings from the drop down at the bottom and send
+++then as quick as you can manage change to Carriage Return in the drop down first and send the above AT command. After the+++you should seeOKand after the AT command you should seeOKOK.You must also send an
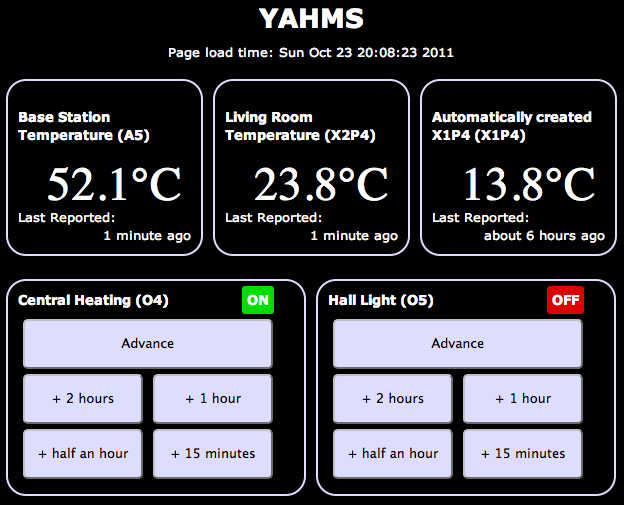
ATWRcommand too to write these settings to the flash memory.Once I did that I started seeing random bits of binary data appearing in the Serial Monitor. Fortunately this was a good thing, it was the temperature data from my probes starting to show up!
I popped the newly configured module into my YAHMs hardware and waited to see if it worked…
As mentioned it was already receiving data so I started to see temperatures show up straight away. The conservatory probe was working straight away which seemed positive as it had issues before. When I took it upstairs it didn’t seem to work at first so I tried angling the box so that the chip antenna would be “pointing” at the base station. This seemed to do the trick and I started collecting temperature readings. Unfortunately as time has gone by I’ve found that it works less and less. I’ve now moved it closer to the base station which got me a few more readings but again it has stopped working. It looks like I’m gonna need a bigger
boataerial!Hopefully I’m going to be able to try out an XBee with an external aerial which should work well on the base station, by this point I’ll have a few spare XBees, including one with a wire aerial so I should be able to get a much bigger range of readings.
-
-
Reversing the Brain Drain
An unfortunate tweet from a friend yesterday suggesting that he might have to leave Liverpool to get a job, led to a little exchange:
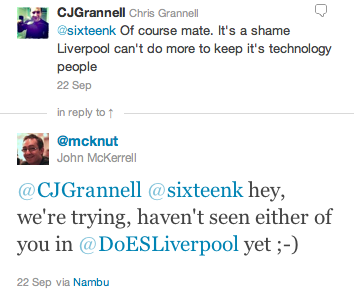
That got me to a realisation:
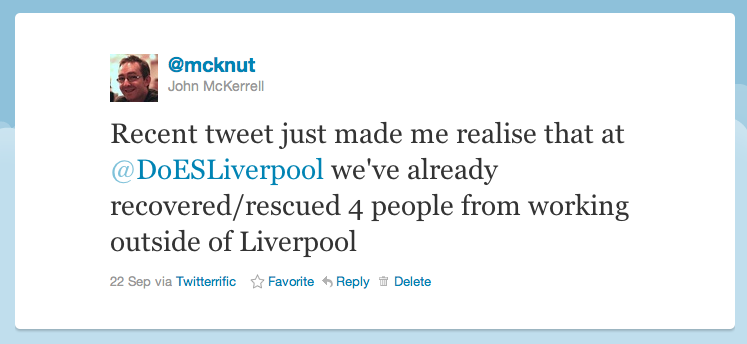
Now that comment is certainly meant to be taken as tongue in cheek, but there’s some very real truth in it. To start with the more tenuous examples. Paul Freeman (@OddEssay) contracts for a company in Eccles, near Manchester. Since setting up DoES Liverpool Paul has been able to spend more time in Liverpool. Yes he’s still working for a company in Eccles but he’s now buying lunch from Liverpool companies and engaging with the Liverpool tech community more regularly.
Let’s move onto Paul Kinlan (@Paul_Kinlan). Paul is a Developer Advocate with Google. He’s based in their London office but also spends a lot of his time travelling around Europe and the world promoting Google Chrome and HTML5. His main reason for being here is to work with developers who are using Google products in the north of England, but by supporting DoES Liverpool and taking a desk with us Paul is now able to spend more time in Liverpool meaning he gets to spend more time with his family who are still based up here.
Finally we have Andy Hughes (@andyhughes86) and Andy Powell (@p0welly). They work for a company in Manchester who had offices in Stockport. Andy and Andy are both developers who worked in an office full of sales people. These were people who spent most of their time on the phone trying to make sales. Not the best environment for a pair of developers who need to get their head down and concentrate. Their company was moving into an office in Central Manchester, a smaller office in a trendier area which was going to mean Andy and Andy would either be in closer quarters with their noisier colleagues, or have to find somewhere else to work. Fortunately they came across DoES Liverpool and came in for their free hot desk day (bringing donuts!) They liked what they saw and took two permanent desks with us. Andy H lives in Runcorn, Andy P lives in New Brighton. Andy H unfortunately still has a long bus ride (but we’ll come back to that) while Andy P now has a 20 minute commute! As it turns out, Andy H is now moving to Liverpool. I had a chat with him recently and asked if he was planning to move to Liverpool before they joined us at DoES Liverpool. He told me that while he really wanted to move here he had resigned himself to living in Manchester. So not only do we have two people who are regularly coming to Liverpool and supporting businesses in the city centre, we’ve also got someone who would have had to live elsewhere being able to live in Liverpool as he’d hoped, paying taxes and again supporting local businesses.
So this blog post certainly isn’t meant to suggest that other places are bad. Generally at the moment though if you want to work for a digital company in Liverpool your choices are to join a digital agency or go it alone. If you don’t want to do this you’ll probably need to work elsewhere. I also recognise that in all of the examples given the person is still working for a company based outside Liverpool. It’s nice though to recognise that even at this early stage DoES is supporting local people and even changing their lives for the better. Hopefully in the future as people start building new businesses based out of DoES those businesses will expand and will start recruiting more and more people from the city who will no longer have to leave just to find a good job.
We also got some more news coverage recently, on Friday getting in the Daily Post for hosting the OpenLabs Developer Breakfast events, and an article 2 weeks ago that we only heard about because someone came into DoES for a look around, as a result of seeing it in the Metro. As it turns out that one was syndicated so we were mentioned all over the place!
-
Another Catch Up, Week 157
A month since my last update, I felt I had to post an update today though as it is in fact the third anniversary of the formation of my company, MKE Computing Ltd!
I’m intending to post a bit of a retrospective sometime over the weekend but thought I’d better update on the general stuff first.
Oh, one other housekeeping note, it seems that for the last few months of updates I’ve managed to mess up the week notes numbers, I first randomly added 3 weeks and then accidentally added 10! This week’s update number was actually lower than the previous one a month ago. I’ve gone through the past updates and updated them to make sure they’re right.
The biggest thing I’ve been “working on” recently is DoES Liverpool. In my last blog post I mentioned that we’d been finalising details of the bank account and the venue. We moved into our space shortly after, spent an intensive week decorating, cleaning up and laying out the space and opened to the public on the 18th July! We’re really happy with how the space has turned out, we’ve got a lovely big open workshop space, a cosy little office space for more intensive working and concentration and then a bright meeting room for when people need a private area or are holding small events. Everyone that has visited so far has been really impressed with our set-up and it’s regularly been compared to a Manhattan loft, we do have a great view onto the gorgeous 1880s built Stanley Building.
Since opening we’ve had various people coming through the doors, we had an open day on Friday 22nd which saw us get two write-ups in the Daily Post and this week we welcomed in another “permanent” desk user (as opposed to the various hot-deskers). Take a look at the website for more information about co-working, hot-desking and workshop space at DoES Liverpool though there’s a few more posts up on the website for the Maker Night regular making events in Liverpool. (The DoES website is actually brand new so you may not see it yet while the DNS propagates but it’ll be there soon)
Besides DoES I’ve actually been relatively quiet for client work. This has been useful for getting things done on DoES but I definitely need to start getting my hands dirty with code again. I’ve started looking at making some upgrades to my CamViewer iOS app and there’s a few more client apps that should be kicking off soon.
I’ll leave it there for the update but hopefully I’ll get my “year notes” up soon to give a retrospective of what I’ve done in the first 3 years of MKE Computing Ltd.
-
Catching Up, Week 152 (was 165)
Long time since an update but there’s some important things going on so I wanted to get up to date.
In the weeks after my last update I continued to work on the Colour Match app for Crown. I’ve added various features to try to help users find the right colour better including adding in a new set of colours that need to be mixed on-demand, and then a set of colour palettes to let you browse the colours similar to the one the app has selected for you. I submitted that app last Thursday and Apple approved it around Tuesday of this week so that’s now available from the app store.

I then went on holiday for two weeks! Apart from a really crap start to the holiday courtesy of US airways and a cancelled flight meaning we were 24 hours late into our destination we actually had a really good time. We started our holiday in San Francisco, eventually having 2 full days there. This was actually my fourth trip to San Francisco but my wife’s first so it was nice to be able to take her around and show her some of the sights I’ve previously enjoyed. The first day was spent within SF doing a bit of shopping, visiting Chinatown and then over to Fisherman’s Wharf to do a boat cruise under the Golden Gate bridge (a first for me actually). On the second day I hired a car (an hour spent in a queue, thanks National!) and we explored a wider area. We drove into the Presidio and I took a photo of my wife with the Yoda fountain at the Lucasfilms HQ. We then continued on to the Golden Gate bridge, we drove over and parked at the viewing spot on the other side to take a photo, we then drove back over and to Baker Beach for a few more photos. The weather wasn’t really beach weather, more gray and cool, but it was still nice to see and take a few photos.
After this we went onto the Golden Gate park. I was originally looking for the Japanese Tea Garden but we ended up getting lost and ending up at the rose garden. This was nice enough to walk around so we had a look and I took some photos. From here we headed south, I was aiming to take the coast road but unfortunately I relied on the GPS too much and it took us mostly on a boring highway to our next destination - Half Moon Bay. The weather still wasn’t really playing ball so we didn’t spend too much time here but drove a short distance north to visit Barbara’s Fish Trap. This is a great little fish restaurant that I found last year (with a WhereCamp friend John Barratt). We both had a mixed seafood selection consisting of a big selection of breaded seafood delights. In the evening we headed back into town to join the WWDC2011 European developer gathering. Unfortunately I hadn’t managed to get a ticket for WWDC (but can you imagine how annoyed I would have been missing the first day due to cancelled flights?!) so it was good to be at least a little involved. I enjoyed a nice micro-brew beer and a good chat with Dave Verwer of Shiny Development and the European Apple developer liaison David Currall.
After San Francisco we flew to Detroit to see friends. This was a great relaxed time, it was good to catch up with friends and meet their new 9 month old twins! We didn’t get up to much while we were there but we did go on a quick trip into Detroit to see Michigan Central Station and even drove over to pay a quick visit to Canada on the other side of the Detroit river. On our last day we made the two hour trip up to see our friend’s grandparents who live on the shore of Lake Superior. They were actually on the shore of Saginaw Bay, so not the main part of the lake, but it was still huge and an impressive sight.
After Detroit we carried on to New York City. We stayed near Times Square and did all the tourist things including visiting Liberty and taking in the view from the top of the Empire State Building. There’s been a few links dotted through this post but if you want to see all my photos take a look at my set of America photos over on flickr.

So, finally, week 165. Just before I went away we signed the paperwork to register a new Community Interest Company - DoES Liverpool. The idea behind DoES Liverpool is to create a space in which people can come together, can use a workshop to design and build products, can co-work on desks and ultimately can build businesses. Much of this week has been taken up with organising paperwork for the company and the bank account and finalising details of the venue. If you’re interested in hearing more about DoES Liverpool then be at GeekUp on Tuesday in Leaf on Bold Street from 6:30pm to hear all the details.

-
Launching Bubblino and Client Apps, Week 146 (was 159)
I spent most of this week updating the Crown “Colour Match” iPhone app that I’ve previously made a few small changes to (I had nothing to do with the original codebase on this app). There was a few false starts while I waited for the graphics for the app, there was a few issues getting them through in just the right formats for the low and high res iPhone screens, but once I’d got them I did manage to make some headway.
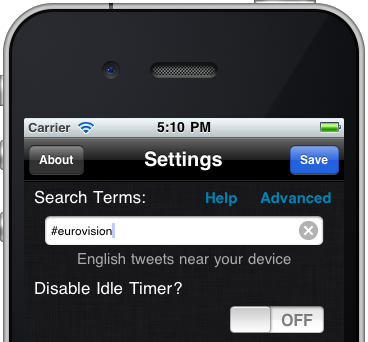
The other thing I did was to launch the new version of Bubblino & Friends. This new version offers some great new graphics, new animations and audio that has been created just for the app. I’m really happy with the app and have enjoyed using it to follow some hashtag searches myself but I have to say that sales have actually been quite low since it launched, lower than I’d like anyway. I think that it’s not clear to people why they need an iPhone app to help them use twitter’s search features. As I say I’ve enjoyed using it but, as ever, people are just never sure about putting down that 59p/99c for something they don’t know they need. Hashtags are in use so much though, from the Eurovision Song Contest Final today (#eurovision) to episodes of The Apprentice (#apprentice OR #theapprentice) people are hashtagging tweets all the time and I do hope this app will become a great way to consume these. I can think of a few things that could improve the experience including finding a way to see more of the tweet text (without, of course, hiding Bubblino away!) with one obvious thing being an iPad version. I’ll be listening carefully to any feedback I get and pushing updates out as soon as I can.
Finally, this week we held two of our Maker Night hacking evenings in the Art and Design Academy of Liverpool John Moores. With a 7-9pm session on Wednesday and a 6-10pm session on Friday we all made lots of progress on the various projects we’ve been working on. On Wednesday I got more involved in the Cupcake 3D printer we’ve been building so that I could spend Friday looking after it (as Ross Jones who has led the build so far couldn’t make it). Friday night’s event was actually part of a wider event going on in Liverpool called Light Night with events occurring all over the city. This was great as it meant we had lots of visitors coming down and finding out about what we were doing and looking at our mini-exhibition of hardware hacks (we had my location clock versions 1 & 2, Mycroft’s Radio, Bubblino and an Internet connected temperature guage). While it was great to tell the visitors about what we were up to it did delay my work on the 3D printer! We eventually got the final few bits done and everything wired up and managed to test the plastic extruder and the platform stepper motors that move everything around. While it was great to have some success I’m afraid the most we managed to “print” was things like this. Next month’s Maker Night should be great as finally the first real objects should be printed, just a shame I won’t be there to see them! If you’re interested in going, head over to the Maker Night website.
-
YAHMS: Base Station
Bit of a delay as I’ve been busy with other things but in this post I’ll be completing the set of YAHMS hardware by discussing the base station hardware and software. The base station has a few jobs to do in my YAHMS setup:
-
Physically connect to the relays via digital output pins.
-
Download the config for digital output pins and then control them.
-
Receive the XBee signals from the temperature probes.
-
Take samples from an on-board temperature sensor.
-
Submit samples received locally and via XBee to the server.
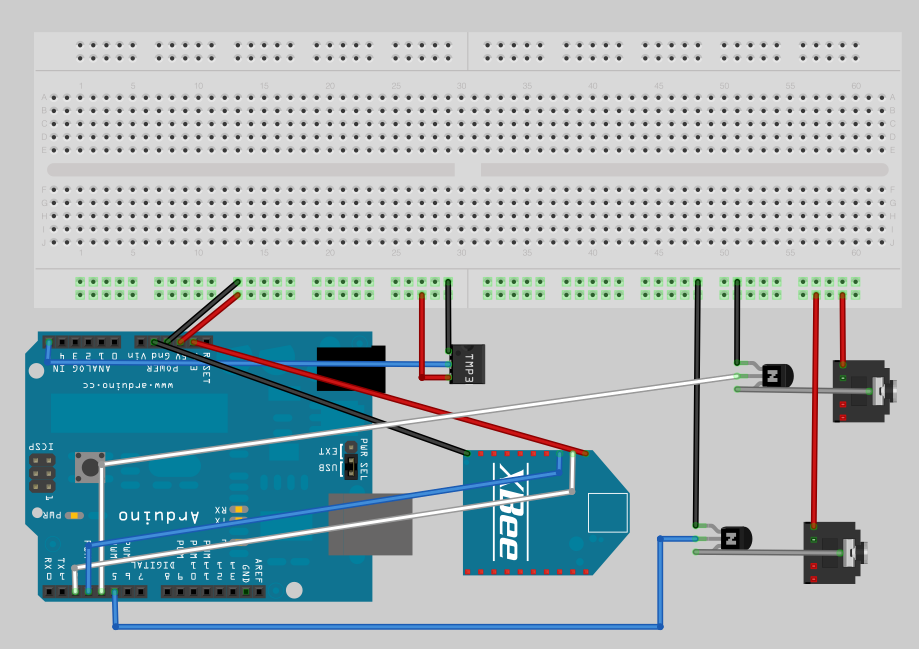
The circuit for this is fairly simple though, just connecting up some inputs and outputs. I mentioned connecting an XBee to an Arduino in the temperature probes post, we simply need to connect the DIN and DOUT pins up to the Arduino so that it can receive the information (and of course the power and ground wires). Because I like to use the main serial interface on the Arduino for outputting debug information back to the computer I’ve gone with connecting to pins 2 & 3 and using the NewSoftSerial which essentially means the serial interface will be provided by software. This isn’t ideal as in theory it means you’re more likely to miss data as it comes in, but the latest software serial drivers largely get around that issue by being interrupt driven. So I end up with the XBee power and ground going directly to one of the grounds on the Arduino board and the regulated 3.3V output, and then pin 2 (DOUT) on the Xbee is plugged into pin 2 on the Arduino and pin 3 (DIN) goes to pin 3 on the Arduino.
I have two NPN transistors turning on the relays (using transistors so that the magnet in a coil relay won’t cause a burst of current draw to the Arduino digital pin) which are plugged into two 3.5mm audio jacks. I have 5VDC power going onto the tip of the headphone jack, the sleeve connection of the jack then goes to the collector on the transistor and the emitter of the transistor completes the circuit by connecting to ground. The base of the two transistors go to pins 4 and 5 respectively on the Arduino.
I also decided to add a temperature sensor onto the board just because I had lots handy and to make sure that I had something to sample locally. The TMP36 is wired to the 5V power supply and then the VOUT goes to A5 on the Arduino to sample the temperature. See my temperature probe post for more details on TMP36s.
Here’s a picture of my original circuit diagram:

And here’s a fritzing version of that diagram:
And here’s a photo of the finished product:
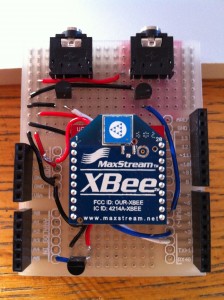 The board I’ve used here is a prototyping shield that I got from @oomlout at MakerFaire. Being a shield it’s really handy and has two sets of connected track on the ends allowing power distribution. I couldn’t find a part for it in Fritzing so I’ve just used the breadboard piece and tried to arrange the parts in the diagram in a similar way to how they ended up, but with more useful spacing.
I had a few small physical problems with the board when it was completed. The pins on the headers on the prototyping shield are note long enough for it to properly stand above the RJ45 jack on an ethernet shield. You can kind-of push it down so that all the contacts are made but it’s not quite ideal. This also means that the RJ45 shielding will short circuit any connections it’s butting against on the prototyping board. That caused a bit of a debugging nightmare for me at first until I realised and applied some insulation tape! Things fit well if you put the ethernet shield on top of the prototyping shield but unfortunately the ethernet shield then didn’t work, I assume because it needs the ICSP connection.
The hardware here is pretty simple but I’ll do a parts list as usual for completeness. Thought I’d also include this cheatsheet which I drew on the second whiteboard in our office:

It’s worth noting that as YAHMS is completely configurable you can actually have whatever circuit you want using any of the digital output pins or Analog input pins, and choosing whether to use the XBee or not, my circuit is only really shown as a guide. In the future I intend to add support for digital inputs too.
Once that was all done it was time to write some software. As I mentioned in the first post I’ve actually open sourced the software for this so you can grab the source code for YAHMS from github and extend and fork it as much as you want. Unfortunately at the moment it has a few non-standard dependencies. The main thing is the new version of the Ethernet libraries that Adrian McEwen (@amcewen) has been working on. These will be part of an Arduino build in the near future but for now you can try getting them from his github fork of the Arduino environment. They’re really useful though as they provide DHCP and DNS support meaning no more fixed IP addresses! I’m also using a HttpClient library that Adrian has also written. This isn’t actually available properly from anywhere yet (but keep an eye on his github repositories!) so I’ve linked to a zip file of the version I’ve used below, that also contains a few other libraries that it uses. The final custom library is a version of this XBee Arduino library that I’ve hacked to support NewSoftSerial instead of just the standard Serial interface, see the links below for that too. You’ll also need NewSoftSerial of course and the Flash library which I’ve used to decrease memory usage. Follow the instructions in
patching_print.txtto patch the system Print library to support the Flash objects.If you manage to get through the rather complicated compilation process for YAHMS you’ll find that you just need to edit the MAC address in YAHMS_Local.h and you’re ready to go. In theory you should not have to configure anything else locally once I have yahms.net working fully. Once running on an Arduino that sketch will retrieve an IP address via DHCP, synchronise the time using NTP and will then attempt to retrieve the latest config for the MAC address from
yahms.netyahms.johnmckerrell.com (yahms.net does work but seems I’ve forgotten to update the source code). Currently there’s no way for you to put your config into yahms.net but hopefully I’ll get that up soon enough. Until that point you can edit YAHMS_SERVER in YAHMS_defines.h and use something on your own system.Config is requested by a HTTP GET request to a URL like the following:
http://yahms.net/api/c/a1b2c3d4e5f6/1/00000000Which breaks down as follows:
/api/c/ a1b2c3d4e5f6 / 1 / 00000000 MAC address of your ethernet shield, as registered with yahms.net Protocol version, currently ignored Time last update was retrieved, idea being that the server will return nothing if the config has not updated, also ignored and incorrectly sent as zeroes by the YAHMS code right now And should return something like this:
YAHMS
A:5
O:4,5
X:2,3
C:30 6 * * * 60 4
C:0 7 * * 8 120 4
C:30 19 * * * 60 4
C:40 16 13 4 * 60 4
C:2 8 6 5 * 60 4
S:60
Which breaks down as:
YAHMS _header, identifies this as YAHMS config_ A: 5 _comma separated list of analog pins to take samples from_ O: 4,5 _comma separated list of digital pins to use for output, controlled by control blocks given later_ X: 2,3 _Pins being used for Xbee as RX then TX_ S: 60 _comma separated list of settings, the first number is a number of minutes that this system is offset from GMT - the server is expected to handle daylight savings time and change this accordingly_ _and a set of control blocks_ C: 30 6 * * * 60 4 _pin 4 turned on at 6:30am every morning for 60 minutes_ C: 0 7 * * 8 120 4 _pin 4 turned on at 7am at weekends for 120 minutes_ C: 30 19 * * * 60 4 _pin 4 turned on at 7:30pm every evening for 60 minutes_ C: 0 * * * 2 10 5 _pin 5 turned on for 10 minutes every hour, every Monday_ C: 0 14 * * 2 10 5 0 _pin 5 turned **off** for 10 minutes at 2:00pm on Mondays, i.e. cancelling out the block on the previous line_ The syntax for the control blocks is inspired by the syntax of crontab although YAHMS only supports either a number or an asterisk (*) for the numbers, and instead of a command the time is followed by a number of minutes, a pin that you want updating and the state you want it to have. An asterisk in a numeric column means that this column always matches, a number means “only use this block when this field has this value”. Here’s a breakdown of the fields:
Field Example Description C: Identifies this as a control block m 30 number of minutes past the hour (0-59) h 6 hours since midnight (0-23) dom 3 day of the month (1-31) mon 5 month of the year (1-12) dow 2 day of the week (Sunday is 1, 8 is weekend, 9 is weekday) len 45 length of time the block is active, in minutes (stored as an int so -32,768 to 32,767 though it would be unlikely you’d use values that big) pin 4 the arduino digital pin that you would like to control state 0 This field is optional and is “on” by default, 1 is on, 0 (zero) is off. So this would give us a very specific control block that turns pin 4 off for 45 minutes from 6:30am on the 3rd of May, but only if that day happened to be a Monday.
At any point in time it would be possible for a number of control blocks to be active for a pin. If any of these blocks specify that the pin should be off then this gets priority and the pin is turned off. The default state for a pin when no control blocks are active is also off. Generally you would only need to have “on” control blocks but the “off” blocks allow you to override, so you can have a block that turns the heating on every evening, but add a temporary “off” block to turn it off on a particularly warm evening.
For sampling, the YAHMS system will take a sample from any analog pins that you have requested on every cycle of the loop method. It will store the last 10 samples and then submit a smoothed value back to the server. For the XBee values it will check every cycle for an XBee packet (waiting for 5 seconds). If it receives a packet it will record a smoothed value from the samples that have been sent. Every minute the system will submit any samples that it has taken, and will then blank the XBee records. This way you won’t get continuous records from the XBee if it stops transmitting. The samples will be sent to the following URL as a HTTP POST:
http://yahms.net/api/s/a1b2c3d4e5f6/1(Again that’s the MAC address and a version number in the URL)
The POST data is sent as
Content-Type: application/x-www-form-urlencodedand will have a format similar to the following:A5=0b8&X1P0;=226&X1P1;=039&X1P2;=05f&X2P0;=233&X2P1;=18f&X2P2;=18f&X2P4;=0de&Each sample is a three digit hex number (three digits is required to send to 10 bit accuracy). The samples from Arduino analog pins will have keys of A0-A5 and samples from an XBee are given as X, then the ID of the unit (the Arduino code will only support single digit IDs at the moment, i.e. 0001-0009 are supported), then the letter P then the XBee Analog/Digital pin that was sampled. So in the above we have a value of 184 from Arduino analog pin 5, then 550 from pin AD0 (pin 20 on the module) of the XBee with ID 0001, we have some more values and end with 222 from pin AD4 (pin 11 on the module) of the XBee with ID 0002.
The code for yahms.net currently requires Rails 2 but I’m thinking that I should update it to work with Rails 3 considering that’s been out for ages. I’m intending to do this update before releasing the code. If anyone particularly wants a copy then let me know and if lots of people do I’ll just release it anyway. For now I’ve linked to a small PHP script below which you can use to send config to your YAHMS system and store the submitted data in a text file. Below are the links to the other custom libraries too:
Do let me know if you find this interesting or useful! I really hope someone does and the more feedback I get the quicker I’ll release the yahms.net code and improve the whole system!
-
-
Weeknotes Week 145 (was 158)
 Quite a mixed week this week as I was expecting some materials from a client to come through to let me work on some updates for them but they didn’t come through until Friday. In theory it was also a short week due to the May Day bank holiday in the UK. As it happened I ended up spending Monday making some final changes to Bubblino, including the addition of bubbles! Such an important thing for Bubblino but I kept forgetting to add them. Really happy with how they came out, they’re randomly generated and individually controlled. At the moment the bubbles all float up which is a bit different to the real Bubblino, but they look good for now. I finally got the app submitted early on Tuesday morning so hopefully it’ll get accepted in the next few days and we can get it up for sale. The new version is going to be on sale for 99c/59p so it’ll be interesting to see if it generates any useful revenue.
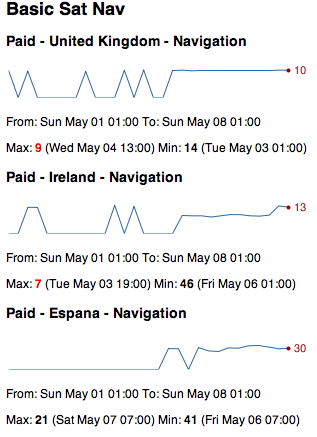
I also spent some time this week trying to improve my App Store Positions service. I’ve noticed recently that the graphs it generates of positions have been fluctuating quite wildly. I’d previously checked that it was successfully completing all the downloads it does so I couldn’t really see what might be the issue and was assuming it was a problem on Apple’s end. As it turns out the problem is definitely on Apple’s end but I have been able to work around it. Basically Apple’s servers are sometimes returning the wrong result for the request I send, i.e. I might request UK Navigation Paid apps and get Venezuelan Navigation Paid apps back. While I would notice a response coming back with incorrect XML because it didn’t have positions data in, I wasn’t checking that what I got back was what I asked for. Fortunately I’ve been able to add a check in and am now retrying all requests that get bad responses. Unfortunately this means that my downloading is now taking about 1 hour 15 minutes when previously it was only taking 30 minutes, but at least I’m getting the right data now! I also improved the style of the emails it sends so that high performing apps are towards the top and the highest app store rankings show up first so I’m glad to be getting some nicer data to present there.
Apart from this most of the week was spent on little bitty things, some (hopefully final) changes to the Chess Viewer and answering various emails. Next week should be more active working on a client app, though that hasn’t started well as I’ve found that the image resources I’ve been sent through are all arbitrarily sized. I’m sure I’ve got a fun week to look forward to.
-
More Bubblino & Friends, Week 144 (was 157)
This has been quite a short week due to the Easter bank holiday on Monday and the public holiday for the royal wedding today. I decided to spend the three days working on the Bubblino & Friends iPhone app that I built back in January.
Soon after January I talked to local artist and illustrator Sophie Green about her providing new artwork for the app and within a week or so she delivered some really nice pics for Bubblino, Pirate Parrot and another character that’ll be new with this version. I also chatted to a voiceover guy who came up with some great quality audio for Pirate Parrot.
Unfortunately I then got busy and so nearly three months passed without progress. This week I’ve finally got going on it again and have made loads of progress. I’ve added the new character and new art throughout. There’s a new tasteful tweet view UI and a nice simple form for building up advanced search queries that even searches using your phone’s location.
The update is essentially done now so I can’t wait to get it on the store, there’s just one more feature I keep forgetting about and some testing to be done but hopefully in just over a week there’ll be a new Bubblino & Friends available to buy on the app store!
Oh, and introducing my new robot friend:
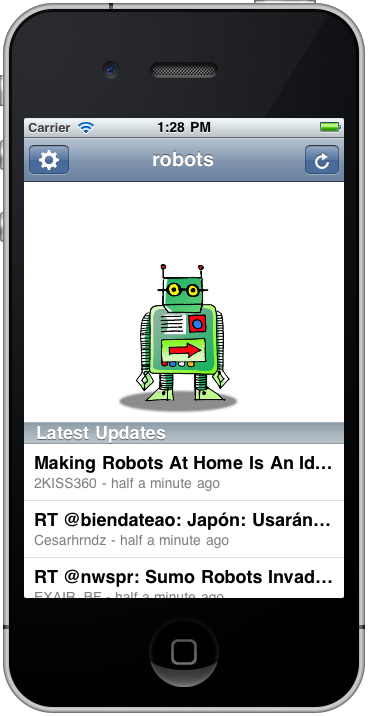
He’s currently going by the name “Mr Roboto” but I’m open to suggestions for something better!
(The text for these weeknotes was all entered through a Kindle device. The screen is so great in the sunlight that I’m desperate to find ways to work on it. The keyboard is a little difficult so I may have to see if it’s possible to use an external one.)
-
YAHMS: Relays
 This should be a fairly short post as the relays are quite simple. I decided to intercept the power to the heating by taking apart an old mechanical timer like these, stripping out all the mechanics and making use of the exposed connections which simply needed shorting to turn the socket on. With the mechanics removed there was plenty of space to fit the relay and the DC connector. I decided, for no particular reason, to use some 3.5mm headphone type jacks to handle turning the relays on and off. wiring it all up was fairly simple, the relay has 5 connections two for the DC connection and 3 for the AC connections, the AC ones are wired up differently depending on whether you want the AC circuit to be on or off when the DC signal is present. I also wired a diode across the DC connections on the relay as protection against any reverse current generated by the coil when the DC power is turned off. After reading the rating on the central heating system’s plug I went for (what I thought was) a 13A rated relay, when I opened the plug later on to rewire it though I found it only had a 3A fuse inside! At least my relay unit will be more capable if I want to use it elsewhere.
The place where my central heating plugs in actually has just two sockets. With this relay and the heating plugging into one that meant I only had one spare. I had already decided to use Powerline Ethernet to get network access to my boiler and so I didn’t actually have anywhere left to plug the Arduino in. I thought it would be a shame to have to load in an extension just for the sake of the Arduino so I began exploring other options. The first thing I looked at was tapping 5v from somewhere in the Powerline Ethernet device I was using, having taken it apart and looked up various of the ICs on the internet though I decided that probably wasn’t a good idea. I’m sure there’s somewhere I could’ve taken it from but considering the device was mostly about varying voltage and playing with everything from mains voltage to DC on the IC and a different level of DC over ethernet I decided to leave this one alone. I ended up looking on Farnell to see if they had any self contained switching PCB power supplies and with some searching help from Adrian McEwen again we found this 5VDC 2.75W switching PSU. I managed to fit this and an old USB socket into my old mechanical timer so that it was not only relay controlled but also provided 5V DC of power via USB, just the thing for an Arduino! The result is quite a nicely put together unit, the only problem being the black insulation tape I’m using to cover up the big circular hole where the mechanics were, I really ought to sort that out sometime. I quite liked the size and capability of the PSU though and may even get some more to power the XBee modules if the batteries don’t power them for long enough.
So, bill of materials for this unit are as follows, I’m not going to bother putting a circuit diagram in as it’s so simple but post comments if you have any questions.
Part Quantity Mechanical timer 1 These are not the ones I used, just an example, so I can’t guarantee they’ll have the same amount of space, in fact they do look a bit smaller than mine. 5VDC/250VAC PCB Relay 1 Data-sheet - I had thought this was 15A rated but looking again seems it might be only 6A Diode 1 Not entirely sure what type of diode this was, just what Adrian had lying around 3.5mm Jack 1 Data-sheet 3.5mm Plug 2 needed for this project (one either end of the connecting cable), this is a pack of ten though Data-sheet 5VDC 2.75W switching regulated PSU 1 Data-sheet Female USB Type A socket 1 Just one I had lying around  For the light switch I went with this 5A solid state relay which I rejected for the central heating control when I thought I needed a 13A relay. Again it just required a simple circuit with a 3.5mm jack and a protection diode across. I’m housing all of this inside a thermoplastic junction box. it does the trick but probably isn’t ideal and has unsightly rubbery cones coming off each side which you can cut down to fit cables. Bill of parts for this one would be:
Part Quantity Thermoplastic junction box 1 Not ideal but does the job Solid state 3-15VDC/240VAC Relay 1 Data-sheet Diode 1 Not entirely sure what type of diode this was, just what Adrian had lying around 3.5mm Jack 1 Data-sheet 3.5mm Plug 2 needed for this project (one either end of the connecting cable), this is a pack of ten though Data-sheet So next blog post should cover the base station, and that’s when thing start to get a bit more interesting.
-
iOS In-app purchases, week 143 (was 156)
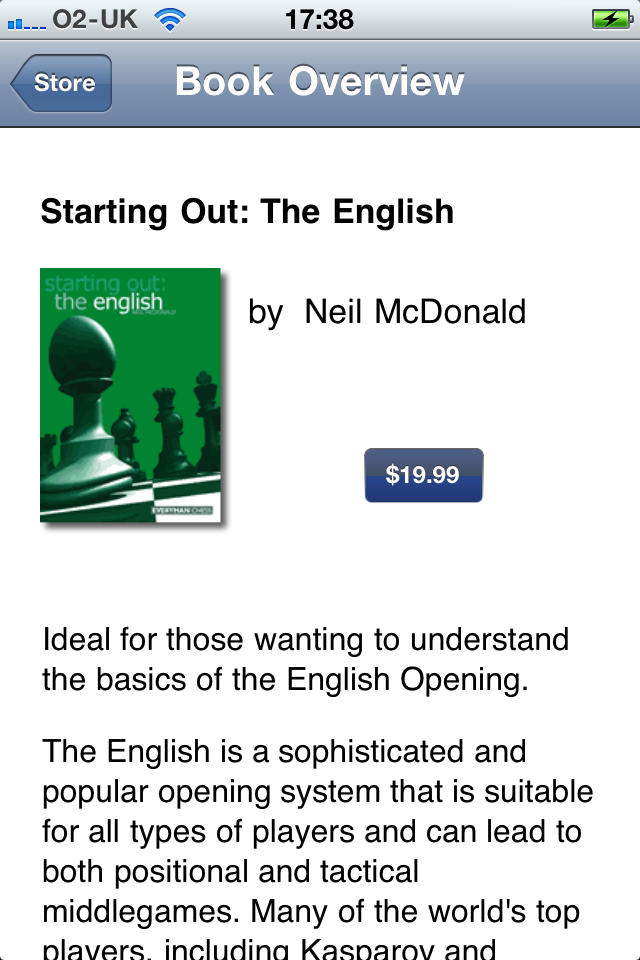
 Spent much of this week finishing off the next stage of development for the Chess Viewer. One of the key things we wanted to get into this version was the ability to buy books from Everyman Chess’s website. If you look at their iPhone app page you’ll see that they have a selection of books available in the right format for the iOS app. Each of these is sold for $19.99. At the moment it would be quite a faff to buy the book in Safari on your phone and then download it and get it into the app, the new functionality aims to make this much easier by letting you browse the books on the phone and purchase them with your iTunes details. I was a little nervous about how difficult this could be having read some horror stories, but it did all seem relatively straight-forward so I had only allowed 2-3 days for it. In the end it did take just about 3 days and wasn’t so bad, I think I was well prepared having read some great web pages about it so that when I did have problems I knew how to handle them. This page had some great information and a class to use to work with the app store. This in-app purchases walkthrough was also invaluable. The first of those links seemed to be aiming for a different sort of thing than I was so I actually used the second more but reading both was good to know what to expect. The second one was good for taking you through the steps you’d need to do, including setting up the items to be purchased in iTunes Connect, and also telling you what you’d need to do before testing. A second page by the same guy gives a good breakdown for how to handle “Invalid Product ID” messages from the app store. I did get to a point where I was repeatedly getting no valid product IDs from Apple’s servers and so was seeing no products in my store, in this case (following the instructions on that page) I needed to delete the app and reinstall it to get things going again.
 I got all of this working and managed to finish the other features and fix a few remaining bugs. I’m really happy with how things are looking, the app has gone from being a fairly basic looking iPhone app (with lots going on under the hood) to a much better presented app (with even more going on under the hood!) Hopefully we won’t find too many bugs while testing over the next few weeks and can get the new version on the store soon.
A few more libraries that really helped me were ASIHTTPRequest - a great iOS class for handling web requests which made it really easy for me to submit files back to the server if people have problems with them, I’m sure I’ll be using this one again. Also ZIStoreButton - a class that mimics the buy button on the app store, it shows up as a blue button with a price in and when tapped changes to green and says “Buy Now”. I’ve linked to my own github fork there as I did make a few changes to make it more compatible with pre-iOS4 devices and to (IMHO) better match the style of the app store button.
Apart from this I attended the 4th Maker Night of the year. That was good fun, we had a great turn-out and had people working on all sorts of different things. I found I wandered between projects catching up with people and helping out but did get time to help complete a few pieces for the Cupcake 3D printer we’ve been building. Also this week, on a similar vein, I’ve been writing up my experiences with my new “home management” system - YAHMS. There’ll be more to come from that when I get time.


subscribe via RSS or via JSON Feed