-
YAHMS: Temperature Probes
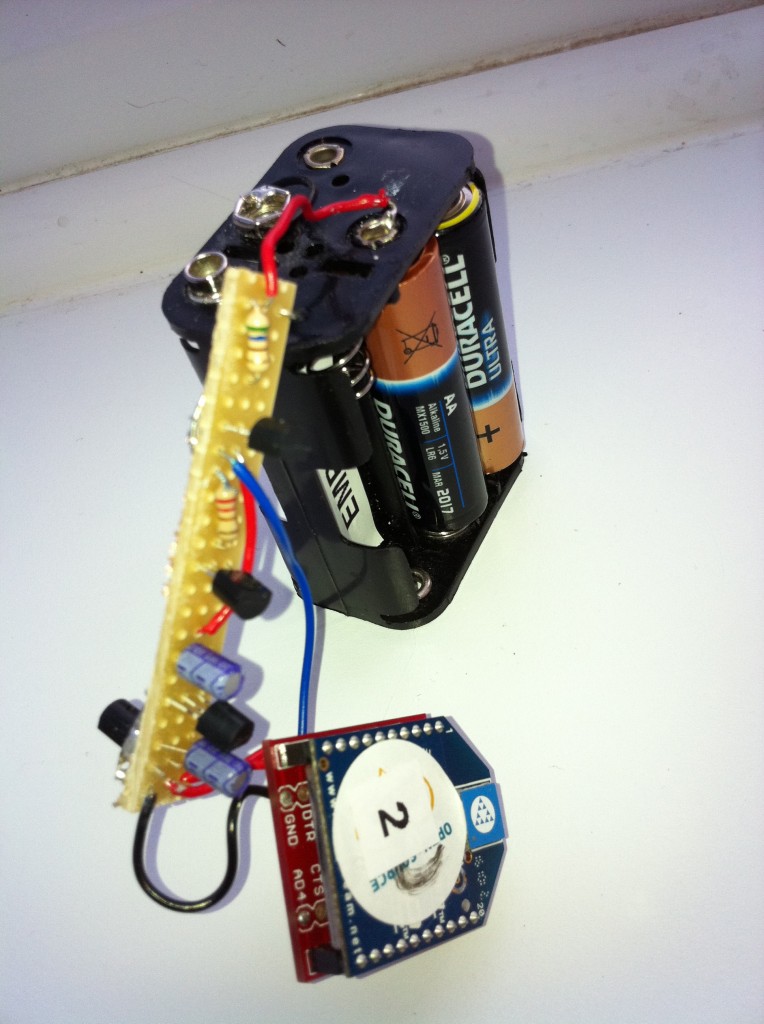
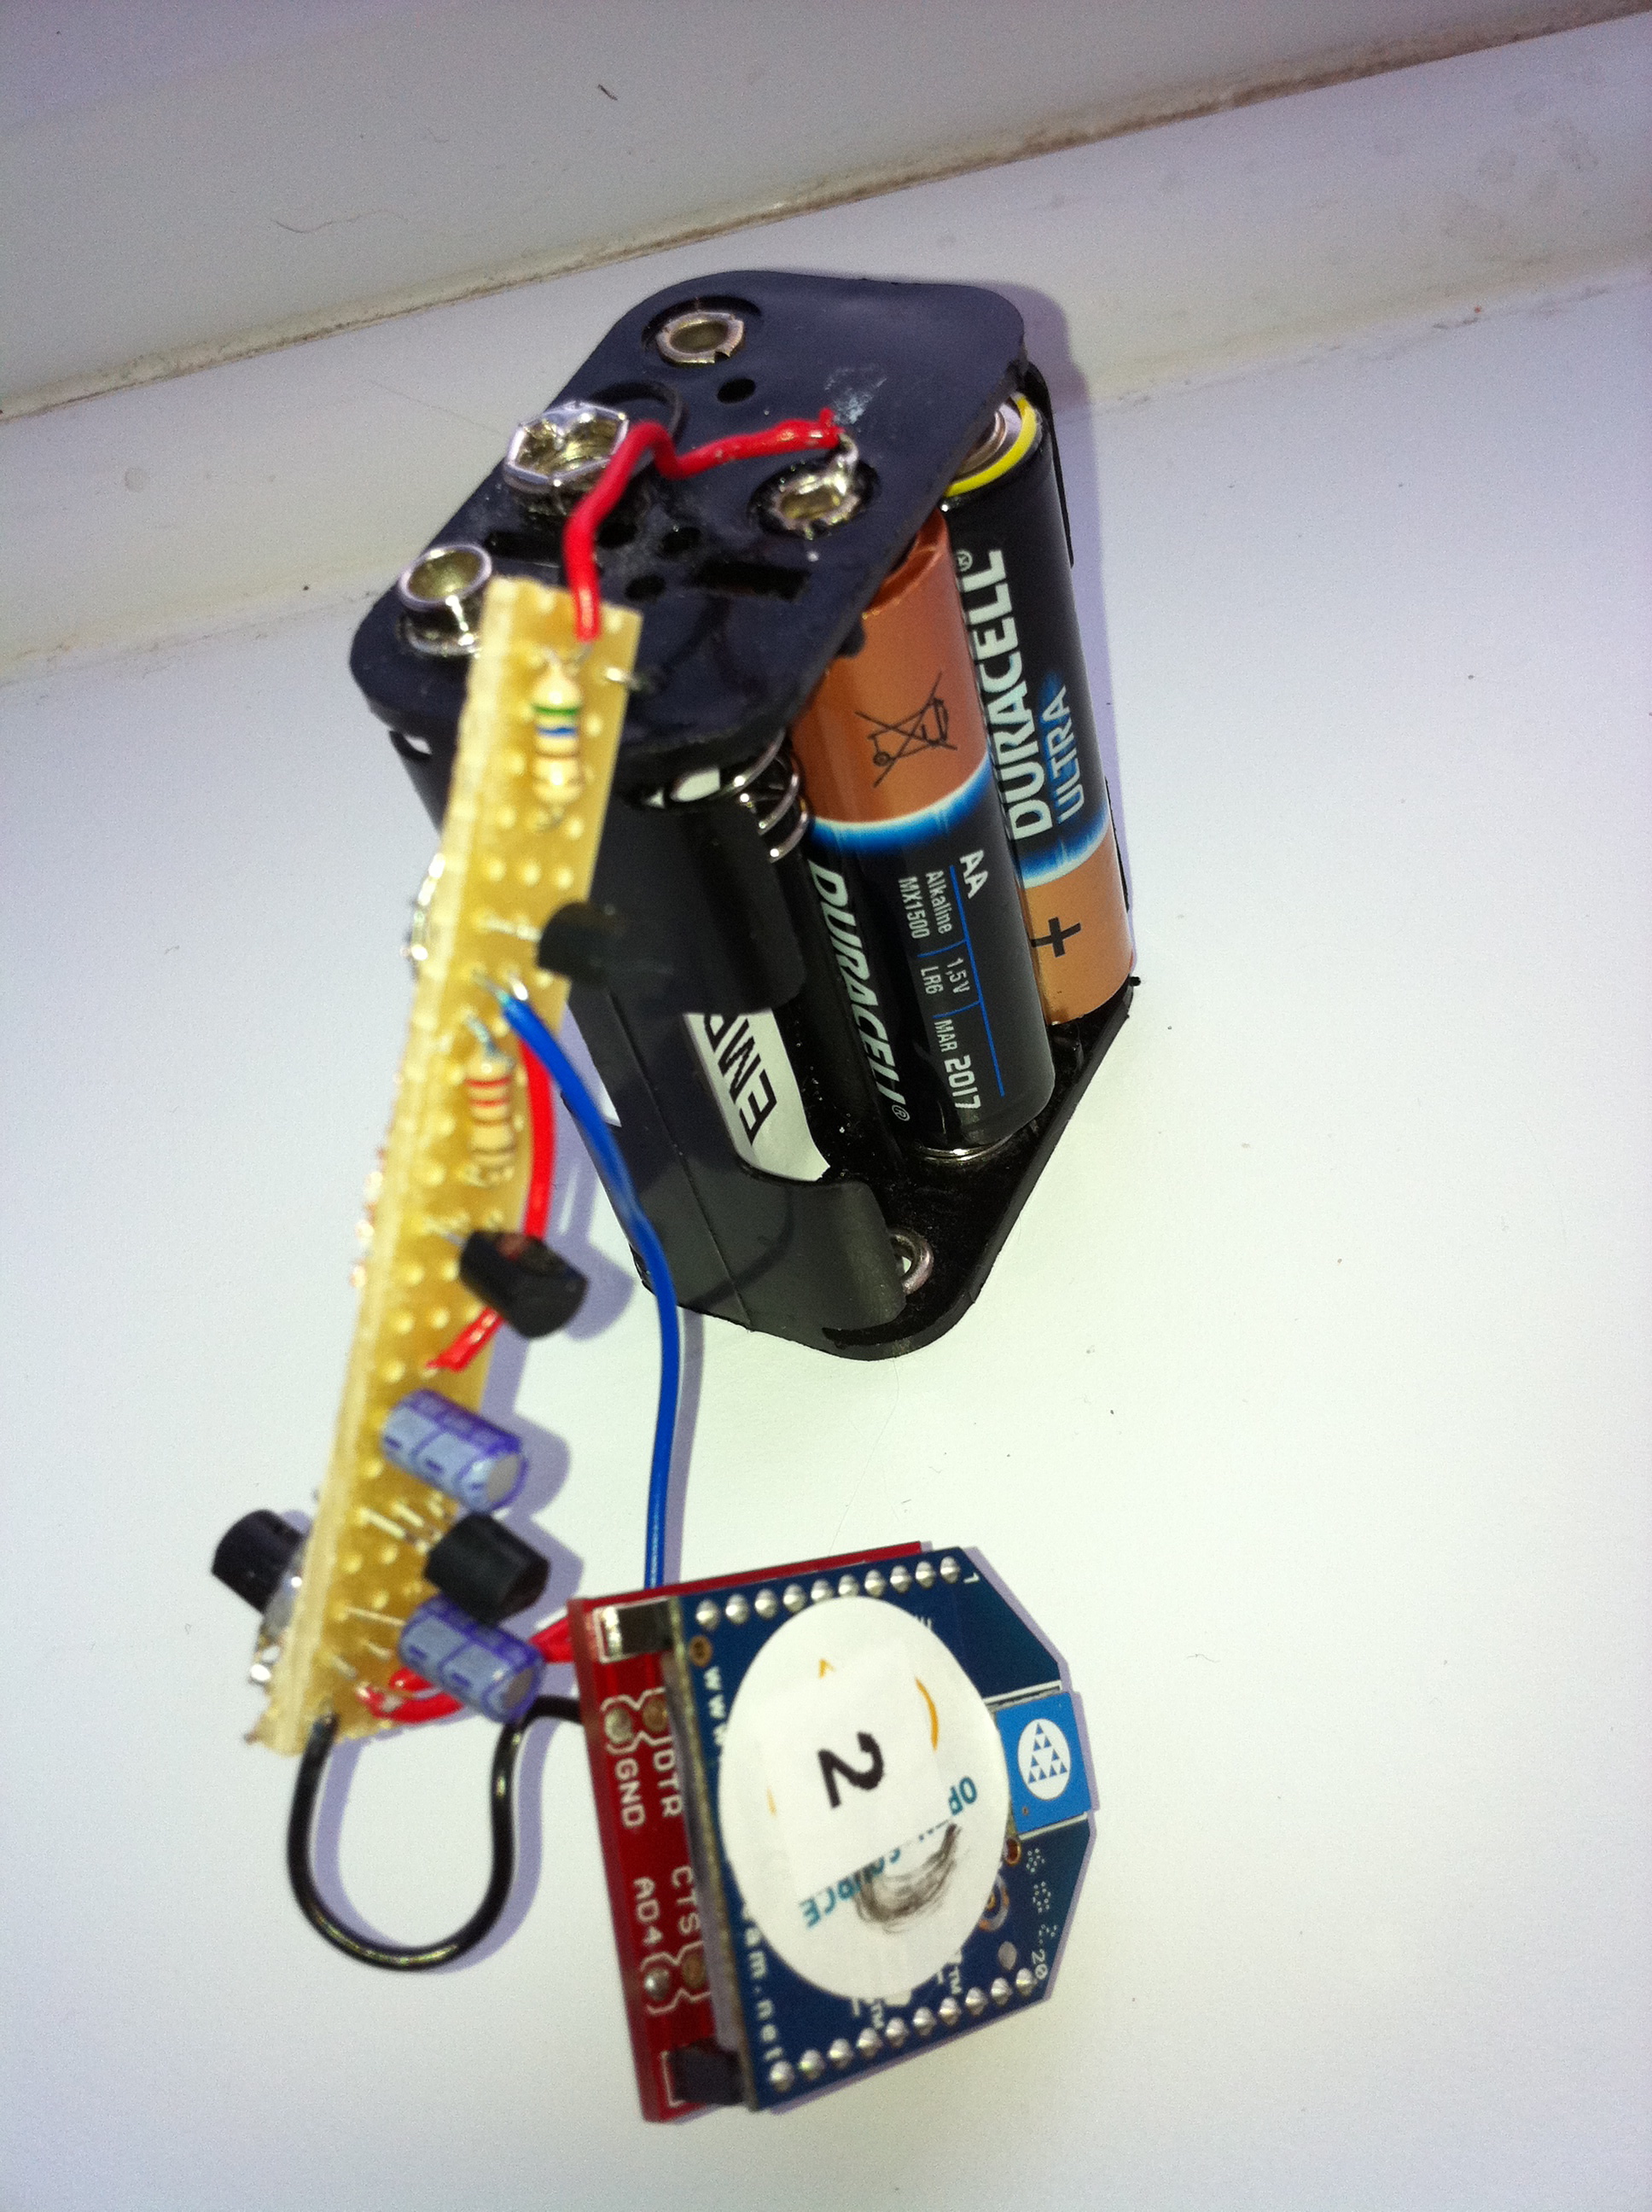
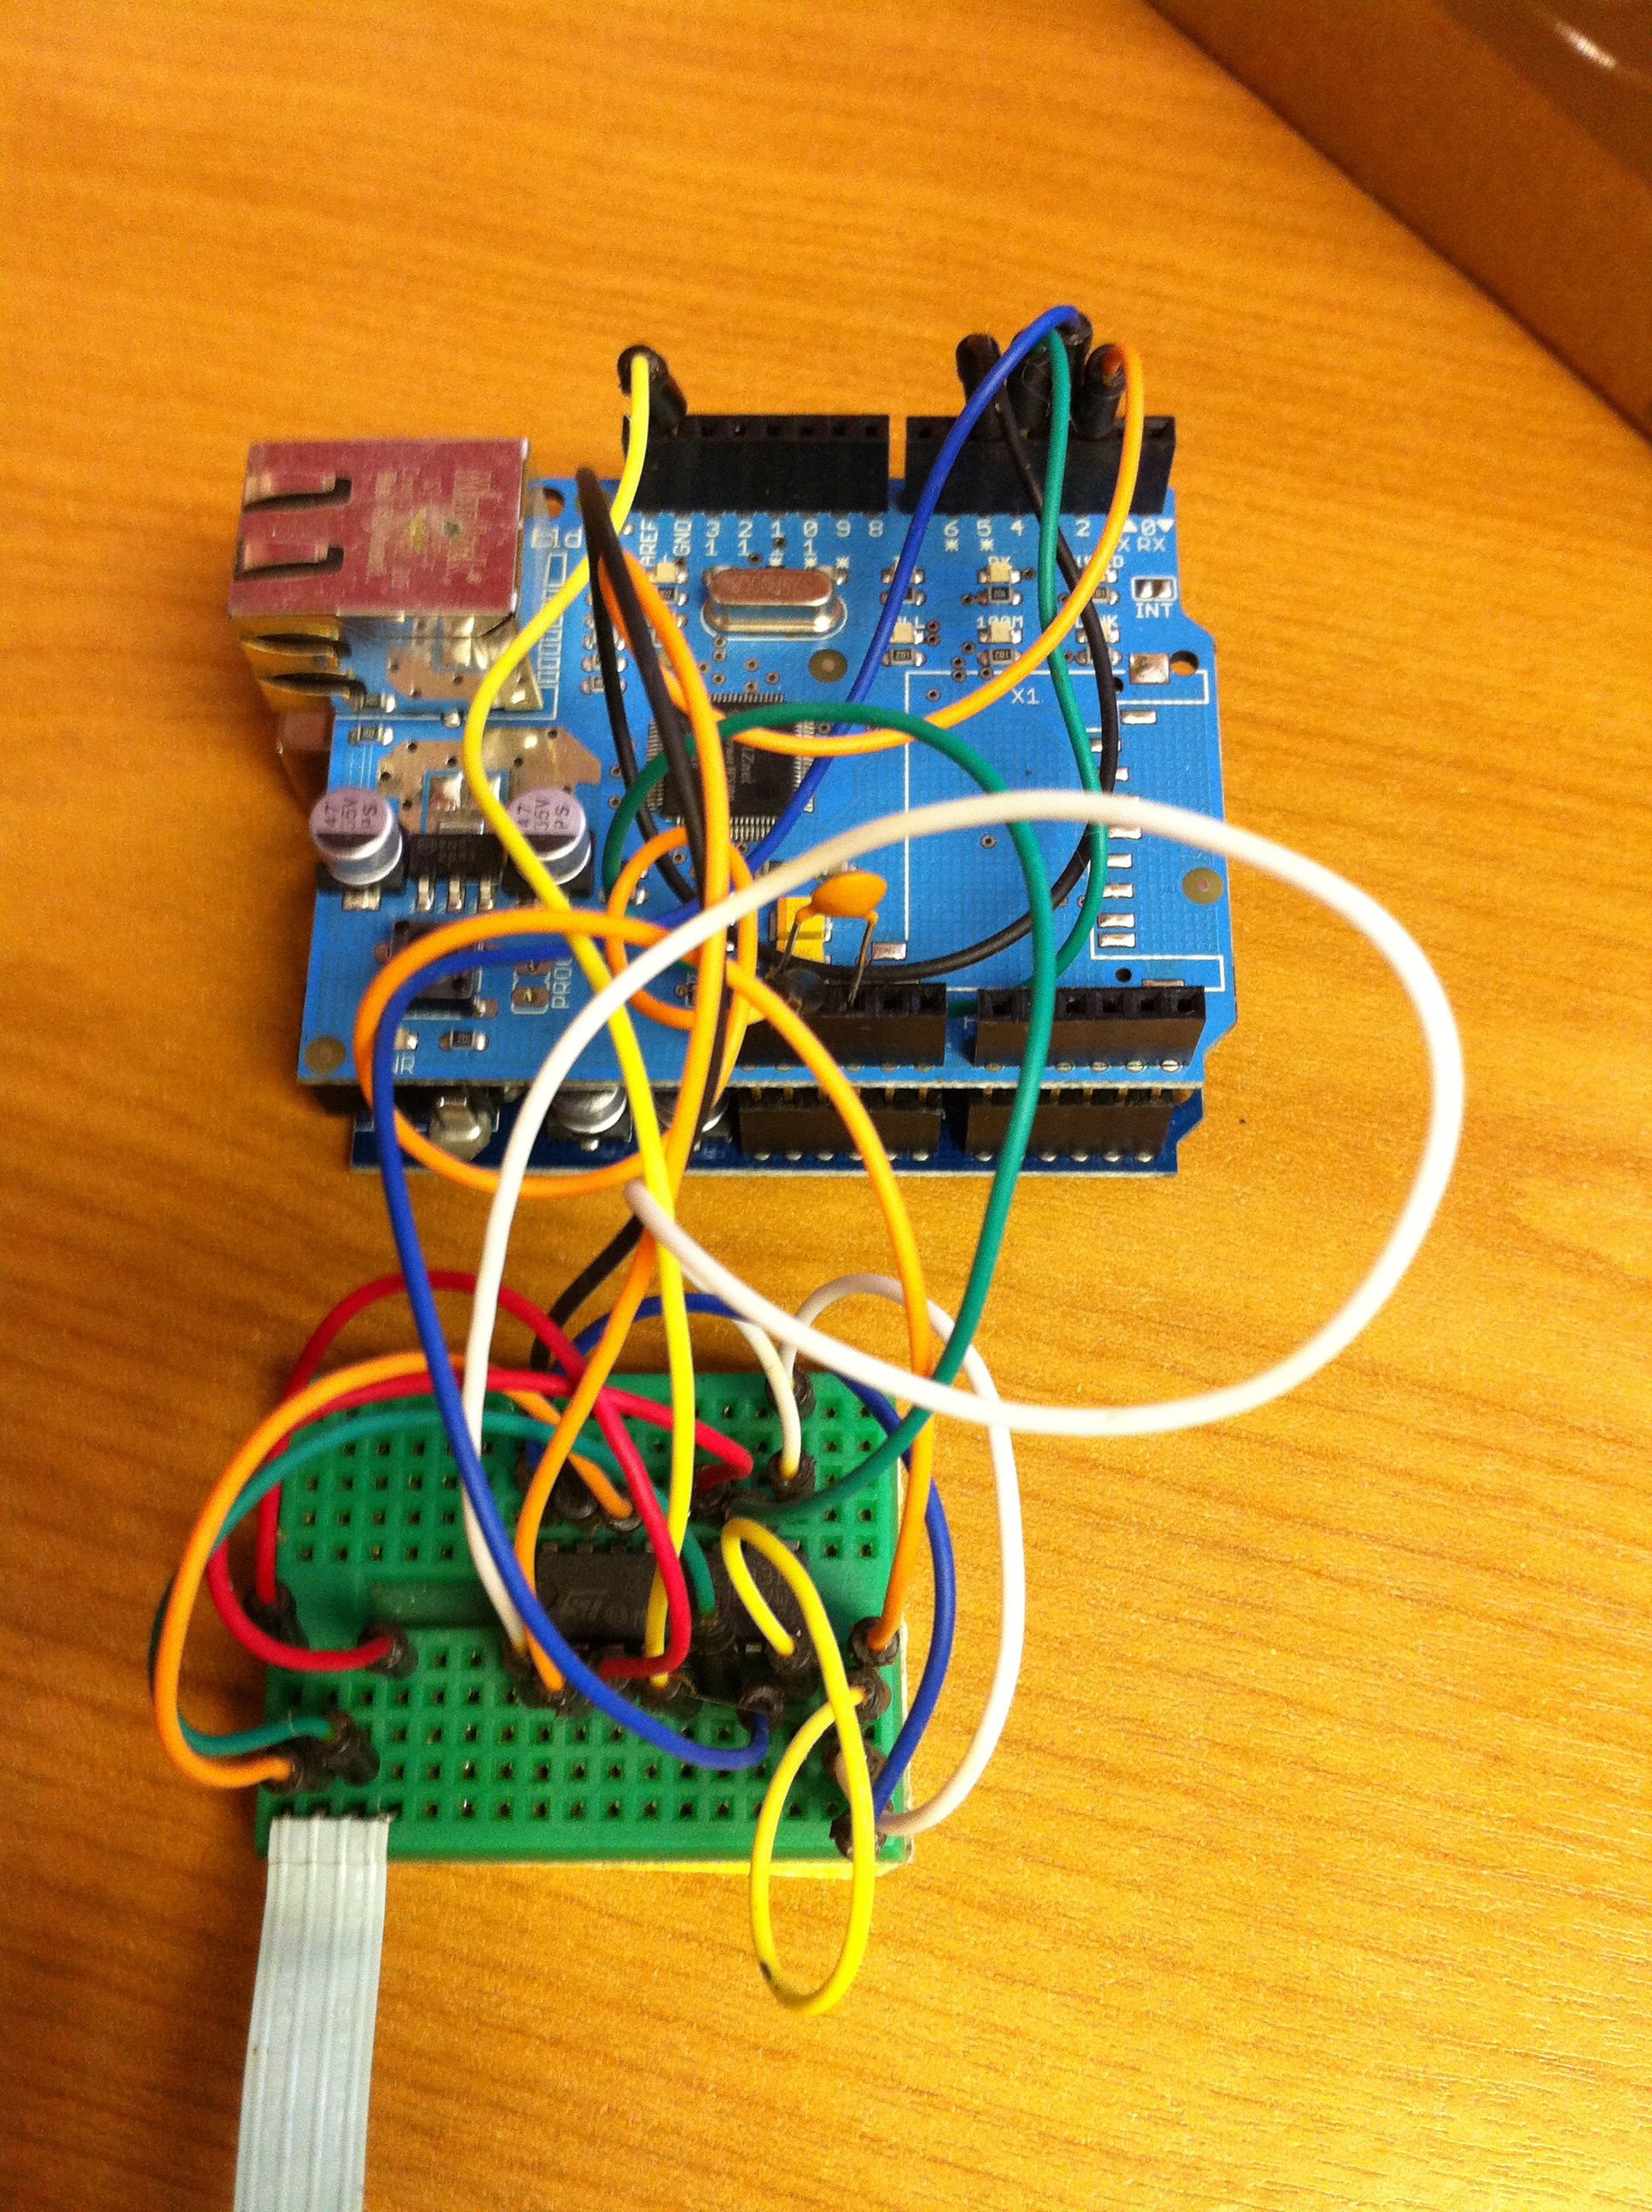
My wireless temperature probes work by using an Xbee module to transmit readings from a TMP36 down to the Arduino base station. The XBees aren’t too cheap, coming in around £19 or $23 so I tried to be cheap and ordered mine from Sparkfun, I bought this XBee (series 1) with Chip Antenna and these breakout boards. I was intending to solder the module directly onto the board and didn’t take notice of what Sparkfun says about “please order the accompanying 2mm sockets (you’ll need 2!) and 0.1” headers below.” (these ones). Once I saw what a stupid idea it was to solder the module (means you can’t switch them around between boards, handy for testing and reprogramming) I ended up buying these headers from Farnell.
As mentioned, to take the temperature reading I’m using a TMP36, these take a voltage of around 3-5.5V as input and will output a voltage between 0-2.7V to indicate the temperature, which can be from -40 - 125°C. In the end I needed three of these for this project, two for another project and managed to kill a friends’ (or it was already dead) so I just bought 10 to make sure I had enough.
XBee modules require regulated 3.3V input, as I’m using the very basic breakout board that just breaks the pins out without adding any functionality I used a MCP1700(-3302E/TO) which accepts up to 6V. In my first order I just bought two, one for each temperature probe. The first time I tried one I managed to connect it to the batteries the wrong way round (in fact the wires on the battery pack were colour coded wrong!) which unfortunately killed the regulator. With this experience and a few others I’ve realised that for something that only costs £0.36 it’s never worth buying “just enough”, always get plenty. The data sheet for that part suggests putting 1 µF capacitors on the input and output, I had issues finding any with that rating that were cheap enough so ended up going with 3.3 µF capacitors. I eventually ordered 10 regulators so ordered 20 capacitors, might as well make sure I had enough to match!
In my initial experiments, when I was still using solar cells, I realised that although the regulator would regulate a large voltage down to 3.3V, if the input voltage was too low the output voltage would actually come out less than 3.3V. This gave me some interesting values when the XBee would just about continue to work, but the reference voltage against which the TMP36’s output was being measured would also drop resulting in temperatures shooting up as the batteries ran out!
I found the solar cells weren’t charging enough to power the XBee throughout the day, let alone through the night, so I decided to switch to batteries. I bought some of these 6xAA battery packs, I later realised I only need 4 batteries to power my regulator (and in fact 6 would be too many, I’d been thinking of Arduinos which would need more like 9V input) but it’s simple enough to short a few connections so that the packs work with 4 batteries instead. One problem I did have with these was that I didn’t get any connectors so I was trying to solder the wires directly onto the pack, this really didn’t work well because the plastic started melting before the solder did, so next time I’ll be buying some PP3 battery connectors like these.
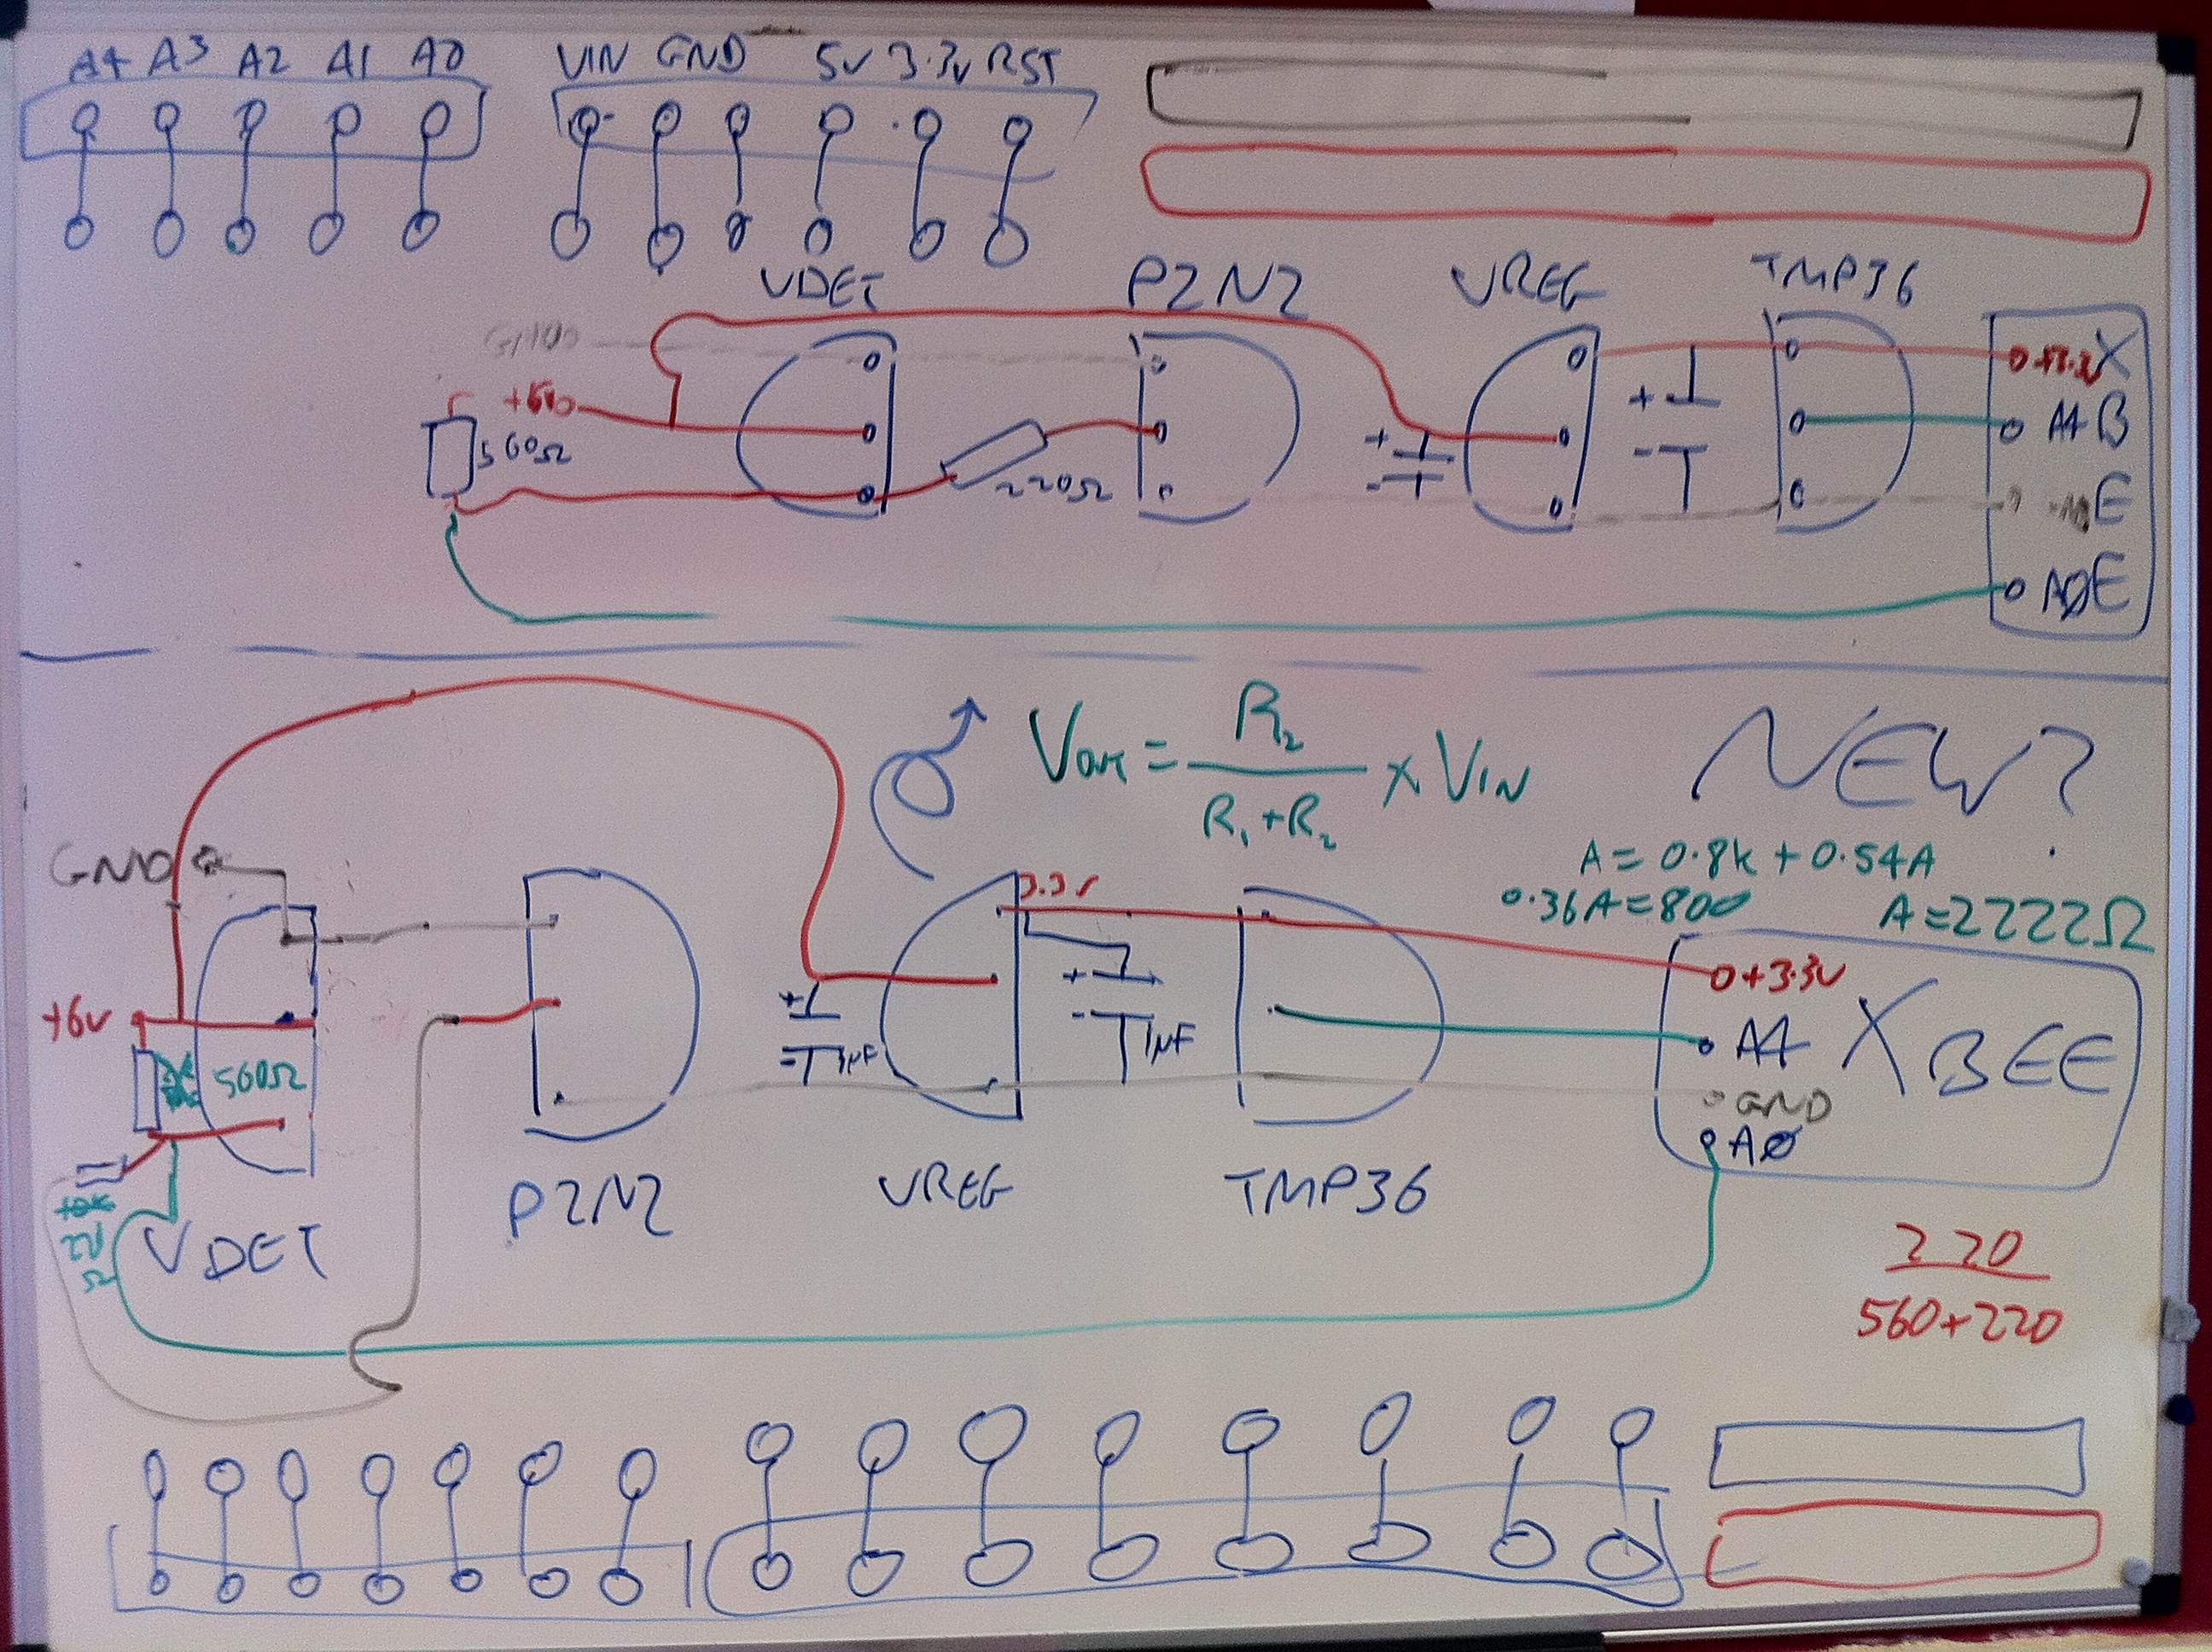
To get around the issue of the voltage dropping below 3.3V I decided to use a voltage detector to detect when the input voltage was getting low and turn the whole circuit off, I used these TC54VN detectors to check for an input of at least 4.2V, meaning that my circuit should now provide between 4.2V and ~6V (4x1.5V AA batteries) to the regulator, or nothing. The voltage detectors I got are “Open Drain” which essentially means that when the voltage is above 4.2V, “VOUT” is floating, i.e. does nothing. When the voltage goes below 4.2V VOUT is pulled to ground. I actually expected VOUT to output the input voltage when the input voltage was high enough but it turns out I would need a TC54VC if I wanted that. The Open Drain version worked well enough once we figured it out (I had a lot of help from Adrian McEwen on this one). I’m using a transistor to turn on the voltage regulator. I pass the battery input to VOUT via a resistor and then onto base on the transistor via another resistor, this way the transistor is turned on, until the voltage drops and VOUT is grounded, short-circuiting the voltage meaning it doesn’t get to the transistor.

The picture above shows the circuit diagram as I was working on it, ignore the Arduino-style pins at the top and bottom. The two circuit diagrams should be just about the same, the higher one was supposed to be clearer. Here’s a fritzing diagram which should hopefully be more useful:
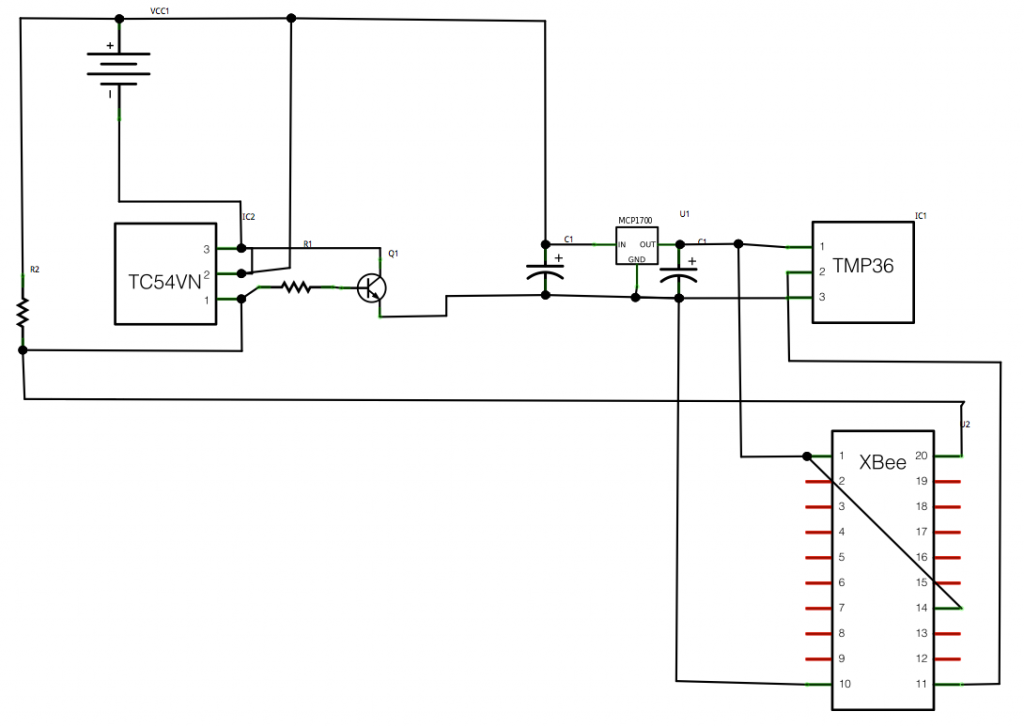
You’ll notice that I’m also running a wire to pin 20 on the XBee, this is A0 and will take an analog read from between the two resistors, they’re acting as a voltage divider which should mean I’ll be able to monitor the battery level and get an idea when I’ll need to change the batteries in advance. It should be possible to calculate, using V=IR, what reading I’ll get as the batteries approach 4.2V.
This seems like a good time for a bill of parts, so here goes:
I’ll also mention now that the Lady Ada article about TMP36 sensors was also really useful for teaching me how these work.
So that’s the power circuit and the temperature sensor all connected up to the XBee but you still need to program the XBee so that it’ll do something useful with that data. Again Lady Ada was really useful here, I followed the instructions on the Tweet-a-Watt which outline how to send current data via XBee. I used essentially the same programming to get my XBee to report the temperature and battery usage data from AD0 and AD4. I also bought the Rough Cut of Building Wireless Sensor Networks from O’Reilly. Unfortunately that only covers Series 2 XBees whereas I’m using Series 1, but the sections about how to wire an XBee up to USB for programming and what apps to use on the computer to speak serial to the XBee were really useful.
To connect the XBee to the computer I actually used an Arduino programmed with an empty sketch (basically
void setup() {} void loop() {}). Pin 2 (DOUT) on the XBee was plugged into Pin 0 (RX) on the Arduino and pin 3 (DIN) on the XBee was plugged into Pin 1 (TX) on the Arduino. In this way I’m basically just piggybacking on the Arduino so that it provides a USB -> Serial interface. I then used the Serial Monitor in the Arduino IDE to send commands to the XBee and monitor the response. There’s more about this in the Tweet-A-Watt article. The program I sent to my probes was the following:ATMY=1,SM=4,ST=3,SP=FF,D4=2,D0=2,IT=13,IR=1,ID=1234Which broken down means:
-
AT - Attention!
-
MY=1, - the ID of this unit
-
SM=4, - Sleep Mode SM (4 = Cyclic sleep)
-
ST=3, - Sleep Time (3 milliseconds after wakeup to go back to sleep)
-
SP=FF, - Sleep Period (0xFF - 255 x 10 ms = ~2.5 seconds)
-
D4=2, - enabling pin AD4
-
D0=2, - enabling pin AD0
-
IT=13, - number of samples (0x13 - 19 samples per packet)
-
IR=1, - sample rate (1ms between samples)
-
ID=1234, - the PAN ID for the network of XBees
Once that has been sent to the XBee it will go into sleep mode. This will mean that the XBee cannot be re-programmed unless you reset it. I actually haven’t figured out how to do that yet and so can’t modify the program on my XBees! I advise that you make sure you’re ready before sending it. It will sleep for 2550ms and then wake up, perform 19 samples with 1ms delay between each, transmit them and then go back to sleep again.
Once you’ve sent that to one of your XBees you can then place the module into the temperature sensing circuit and it should start transmitting temperatures. On the base station you would connect an unprogrammed XBee to an Arduino as above and send the following to it, this just sets the PAN ID and the modules own ID (to zero):
ATMY=0,ID=1234Now if you monitor the output on the serial connection you should see data being sent about every 2.5s. You can then use the XBee library for Arduino to parse this, or use the code for YAHMS as will be explained later in this series. If you are going to use the XBee library, be aware that the version available for download (0.2.1) actually contains a bug meaning it will give the same output for all pins, use the version in SVN instead which has been fixed.
Still to come, the relays and the base station, watch this space!
-
-
Tasty tasty YAHMS
I’ve mentioned a few times on recent blog posts about the Arduino project I’ve been working on to provide an internet controlled system for my central heating. I’m glad to be able to say I’ve finally got this working, but not only that, I’ve also opted to release the source code so that others can make use of it. The source code comes in two parts, the code to run on your Arduino and the code to run on the server side. I’m releasing both parts as Open Source Software as I realise that I’m not necessarily going to get time to add features that others need and by opening up the source code I can allow more people to get involved. I’ll be running the server side on yahms.net and will be letting anyone sign up to use the site. Right now that’s not hugely useful as new programs can only be added by inserting directly in the database but hopefully I or someone else will get around to knocking up some more UI and an API. I haven’t really mentioned what the site or the system actually does so I’ll give some brief summaries about the system and the hardware and then will be posting full build logs for all pieces of the hardware shortly.
A little more about the system in general then. I decided before Christmas that I wanted to be able to control my central heating from the Internet. What made me finally decide to do it was when I realised that my existing controller is simply plugged into a 3-pin socket meaning that all I needed to do was set the existing controller to be on constantly and then find a hardware solution that would allow me to get in between the 3-pin plug and socket to control the system. One of the things that made me decide I should build the system was the spate of cold weather we had. It seemed to come on all of a sudden so there was a number of mornings we’d wake up at 7am and find that because the weather was so cold the heating hadn’t been on for long enough. To solve this I decided I needed some intelligent temperature control that would turn the heating on earlier when we’re having a cold morning. A similar but different problem is when we go on holiday for a few days and come back to a cold house, with the heating controlled from the internet we’ll be able to have the heating fully off while we’re away but make it turn on a few hours before we get home.
So, the smallest part of the system is the temperature “probes”. Partly just to experiment with Xbee but also to get an idea for how the house retained heat I decided I wanted to put a few wireless temperature probes around the house. In theory they should be very simple just using an Xbee with a TMP36 temperature sensor feeding into them, in actual fact I’ve ended up with about 10 separate parts, most of which are there to make sure I get a steady regulated power source to the Xbee. Originally I had been hoping to power them from a battery-backed solar panel but in the end I’ve had to go with batteries.
To control my hall light I’m using a solid-state relay wired into the power line for the light. I had hoped to be able to make this non-invasive by wiring into the light switch but had difficulty getting the wire through the wall to the switch so ended up having to cut the line and re-connect it in a junction box which I could then wire up to my relay. The light is turned on by short-circuiting the two wires on this line and can be done either by turning my relay on or by using the existing switch. This means you don’t have to use the internet to turn the light on, but once the internet has turned it on you can’t turn it off locally, but that’s not a big deal.
To intercept the power to the heating I used an old mechanical timer with all the mechanics removed. This left me with a nice simple device which I only needed to short circuit two connections to turn on the circuit. A simple relay did the job here too and I had enough space left to add in a power module so that I can provide 5v USB power from it too, but more about that in the dedicated post. I can leave the existing heating controls set to “Constant” so that as soon as I turn the socket on, the heating comes on too.
Finally, to control the two relays and receive signals from the Xbee modules I put together a simple Arduino shield. It has an Xbee module connected to receive the signals, some wired jacks to send signals to the relays and also a temperature sensor, just “because”. The Arduino also has an Ethernet shield so the software is able to download configuration from yahms.net and turn the relays on and off in response to that config, it can also submit sensor readings back over the connection too.
So that’s the general overview, I’ll go into more detail in the next few posts and talk more about the software as well as the hardware and what they’re both capable of.
-
Big iOS Database, Week 142 (was 145)
Another week spent on the Chess Viewer app. One of the features that I’m adding is support for searching within the chess games, specifically of the filenames and the headers that are generally attached to each game. In the original app I was reading all of this information into memory and storing it in a big in-memory data structure of arrays and dictionaries. This made the searching fast but also made it complicated and could result in having very big data structures in memory. To fix this I decided to use Core Data.
Core Data is the “Model” part of the Model View Controller paradigm in iOS and is the recommended way to store your data. It’s generally backed by an sqlite database so can be quite quick but as it’s an Object Model can be simple to work with from code without having to use SQL. I ported the code over to use it pretty quickly and then sent a build over to the client to try out. Unfortunately the app crashed for them soon after launching, in fact they couldn’t get it to launch at all. It turned out that as the code was parsing the chess files and building up the Core Data data model it was using excessive amounts of memory. It could also be really slow, some files (specifically The Week in Chess) can hold around a thousand games, each of those games will then have an average of ten headers each meaning you end up with around ten thousand headers to store. This alone causes the parsing to be slow and use memory, but if you have multiple of these files (and TWIC is updated weekly) it could cause real problems. This was mostly a problem on the iPhone 3G but it would be silly to refuse to support it.
In the end I decided to use sqlite without going via Apple’s Core Data model. Perhaps there was a way to optimise the existing code but I couldn’t find it in the days I spent on it. Considering the search function was supposed to be a half day task I really needed to move on! Previously I’ve tried using the sqlite functions directly, these are a real pain to work with so it’s fortunate that I came across FMDB quite recently. This is a library that wraps the C functions of sqlite with a nice Objective-C interface making things much easier to work with. Again I managed to port the code over to use this without too much difficulty… I still had to make various optimisations to make sure that the big imports don’t take too long and that the searching would be as fast as possible. It’s “funny” when spending so much time on something like this, it’s only really going to affect people upgrading to the latest version that have big files, as this is when the database will be built initially. When downloading files in the future it shouldn’t be so bad considering there’ll only generally be one file being processed at a time.
In case anyone else has issues I thought I’d paste in some snippets (uninteresting bits of code replaced with comments) to show how I ended up doing things:
// OPEN THE DATABASE

// All the insert statements are the same so this makes sure
// sqlite doesn't have to parse them repeatedly
[db setShouldCacheStatements:YES];

// This stops sqlite from writing to disk so much, increases the
// chance of db corruption but if we die half-way through an
// update we'll need to start from scratch anyway
sqlite3_exec([db sqliteHandle],
    "PRAGMA synchronous=OFF", NULL, NULL, NULL);
sqlite3_exec([db sqliteHandle],
    "PRAGMA journal_mode=MEMORY", NULL, NULL, NULL);
sqlite3_exec([db sqliteHandle],
    "PRAGMA temp_store=MEMORY", NULL, NULL, NULL);
// Use memory as much as possible, <a href="http://www.sqlite.org/pragma.html">more on sqlite pragmas here</a>

// I actually tried to make sure I didn't use any autoreleased
// objects but there was one I couldn't avoid and could be
// some in code I didn't control anyway.
// Having my own pool means I can release these periodically
NSAutoreleasePool *pool = [[NSAutoreleasePool alloc] init];

// This monitors how many inserts we've done
NSUInteger numUpdates = 0;

// Tell the database not to commit the inserts straight away
[db beginTransaction];

// FOR EACH FILE

    // FOR EACH GAME IN THE FILE

        // INSERT ROW IN DATABASE FOR FILE

        // FOR EACH HEADER IN THE GAME

            // INSERT ROW IN DATABASE FOR HEADER

            ++numUpdates;
            if (memoryWarning || numUpdates > 5000) {
                [db commit];
                [db beginTransaction];
                memoryWarning = NO;
                numUpdates = 0;
                [pool drain];
                pool = [[NSAutoreleasePool alloc] init];
            }
So what’s happening there is every 5000 inserts for a file we’re committing the transaction to the database and clearing the auto release pool. This way we should hopefully not run out of memory but will run as fast as possible. You’ll notice there’s a memoryWarning flag too, this gets set separately by a notification, so if we get a memory warning before we’ve done 5000 transactions we’ll still commit the transaction and clear the pool to clear out as much as possible.
And, finally, more progress on my Arduino control system, I’ve got all the bits working now so that I can control my central heating and hall light from a website. The UI still needs a lot of work but it essentially matches the abilities of the original central heating controller and that’s the minimum I need in the short term. I’ll be putting some blog posts up with build logs soon.
-
MKEReviewRequester, Weeknotes Week 141 (was 144)
Spent this week making improvements to the Chess Viewer that I released for Everyman Chess a few weeks ago. It was good to spend some time re-factoring an app that I actually started building about a year ago.
Monday was largely spent redoing the code for the “ChessBoardView” to use Core Animation Layers. I had to make some quite fundamental changes so that I could track the movement of the pieces but at the end of it I had a board that shows nice animations as pieces move around and are taken, and also added the ability to flip the board around to see if it from the point of view of the black player.
On Tuesday I added a feature to prompt the user of the app to review the app on the app store. Lots of apps have started doing this but I couldn’t find a simple small library to implement this, so I did it myself. The code for MKEReviewRequester is now available on Github, there’s some instructions in the README file but it’s fairly simple. Set some variables when the app launches, call a method every time a significant app action occurs (an ebook is read or a game is played) and then call another method at the point you want to display the alert to users. The code was all based around some code I found on this blog post, I just wrapped it together into a nice simple class.
Got lots more done on the app too but have run into a problem with preparing Ad-Hoc builds on my Xcode4 install so annoyingly I can’t show the updates to the client. Need to check whether I can distribute a different app and also try my old laptop, hopefully one of those will work.
Today (Friday) I’ve finally managed to get the memory usage on one of my Arduino projects down so that it fits within the 2K of RAM provided. I should hopefully be writing up some build notes on that with more details shortly.
-
Social Media Cafe Liverpool, Week 133
I’ve had a busy week this week attending the various Social Media in Liverpool Week events that I wrote about last week. I just wanted to post an update to talk about the Social Media Cafe Liverpool iPhone app that I released last night.

Unfortunately I wasn’t able to declare the app live last night but the review went through and I can finally do it, head here to download the app and get lots of information about the great talks we’ve had at Social Media Cafe over the last year. You can find the slides for my Life Cycle of an iPhone App talk here.
As I mentioned in my talk, I have made the app available as Open Source Software under the Artistic License 2.0. What this means is that anyone can go away and create apps based on my code. The main requirement is that if you do so then you can’t modify the source code to hide the fact that I was the original creator, but read the license for confirmation on the details.
The source code is actually available in two parts. The Social Media Cafe app is quite simple and small and provides an app that will download a feed of information and then pass it on to a “Hierarchy View Controller”. This is part of the “HierarchyApp” which is a separate code base which I developed last year. I’ve also released this as open source under the same license so with both of these available anyone should be able to develop some interesting apps with a minimum of effort. Click the following links for more information:
Social Media Cafe iPhone app on GitHub
While the data within the app can be updated by modifying a simple text file on a server there’s still plenty of features that the app could do with, which will require modifying the source code. It might be nice to have a page of information about the next event, or perhaps a page showing recent twitter traffic. If you have any ideas for features, or you come across bugs, then add them to the smcliv Issues page on GitHub and hopefully I, or anyone else who feels like delving into the code, will add them.
If you do use the code then I’d love to hear about it and see what you’ve done, and if you want me to help you develop an app I’d still be happy to get involved.
-
General Update - Week 132
So, what have I been doing since November 27th?
- Secret Location Startup
- New version of Basic Sat Nav/Basic GPS launched 19th December with audio support and Spanish translations!
- “HTML5” and Android version of Examstutor.com apps almost finished!
- Bubblino & Friends iPhone app went from idea to submission in less than 24 hours, and is live on the App Store!

- CamViewer for Foscam Webcams goes live after a short dev time and gets hundreds of downloads and rave reviews on the App Store!

- After over a year “in development” Chess Viewer has gone live offering an advanced viewer for chess e-books popular amongst chess fanatics. Further development is planned including in-app purchase of e-books from Everyman Chess.
And all of this has taken me to the point where I’ve had 50 apps live on the app store! Not all of these are live right now as some of the Revise apps were replaced by Examstutor.com apps but I currently have 18 Examstutor.com, 15 Reviseapps.com, Basic Sat Nav, Bubblino & Friends, CamViewer, Chess Viewer, Credit Cards, iFreeThePostcode = 39 apps live right now and another one should be coming this week. Even discounting the carbon copies that’s still 9 separate code-bases, and again doesn’t include the app I completed for 7digital which Apple are unfortunately barring from the store. I’ve been busy and hopefully will continue to be with both client work and my own projects as this year progresses.
If you want me to help with a mobile web, or native mobile app, then get in touch by emailing me at john “At” mckerrell “dot” net
-
Social Media in Liverpool Week
I’ll be posting an update of what I’ve been up to recently soon but I also wanted to write something about what’s happening in the coming week. We’re celebrating “Social Media in Liverpool Week” (we got told off for calling it Social Media Week™(C)®) and also Global Ignite Week with a week of activities in Liverpool. Getting into the spirit of things I’ve agreed to speak at two of them.
The first event of the week is Ignite Liverpool tomorrow in the LJMU Art & Design Academy. I was quite disappointed not to be able to speak last year (though I must admit I did enjoy my time on a yacht in the Whitsundays ;-)) so I jumped at the chance to speak this year. I’m going to be giving a talk on “Open Source Software Projects I Have Known”. I’m intending it to be a fairly lighthearted overview of various applications and projects that people should really be aware of and using. There’s lots of other talks lined up so if you’re in the area you should definitely come along. There’s not many tickets left so be quick!
On Wednesday there will be a meeting of the Society of Swandeliers, or the Friends of Swan Pedalo. In Autumn John O’Shea of Re-Dock procured a Swan pedalo that was being sold off cheap by Liverpool Biennial organisation. This meeting is of people who have shown interest in working with the pedalo to try to determine what to do with it. We’ve all got lots of ideas but a 6ft fibreglass swan isn’t so easy to move around so it can be quite difficult to arrange activities for it. I’ll be going along and hopefully we’ll all be able to work something out.
Thursday is time for another Social Media Cafe Liverpool event, also in the Art & Design Academy. I’ll be giving a talk on the lifecycle of an iPhone app. I’m intending to give an idea of the various stages you go through when building an app and getting it live on the app store. I’ll also have a few surprises during my talk too. There’s also going to be a live skype interview and more besides so head over to the website to sign up for that.
Finally on Friday there’s going to be the Social Media Social or “Oh, I follow you on Twitter”. More details on that can be found on the Social Media Cafe Liverpool website but essentially it’s a free party in the Leaf bar on Bold St. Entertainment will be provided (but you’ll need to buy your own drinks!) I’m going to a friend’s birthday party first but should be there later on in the evening.
So a busy week ahead, should be fun!
-
Working with Android addJavascriptInterface
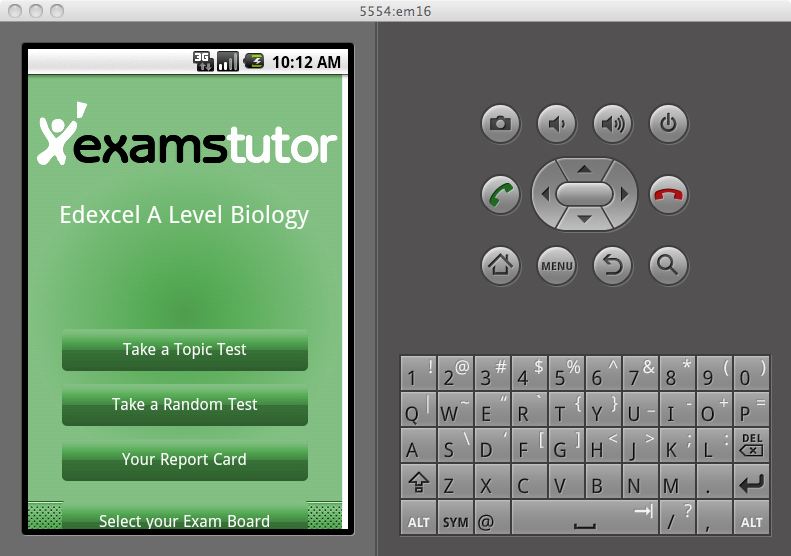
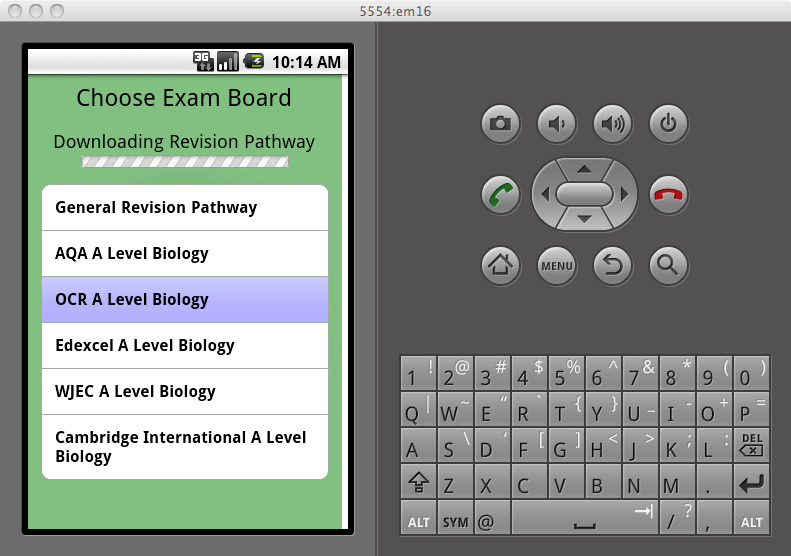
I’ve been spending a few days this week trying to get my Examstutor.com apps working on Android. I had already decided to do this using HTML and spent the past two weeks creating a “HTML5” version of the app. I was surprised but pleased about how quickly I managed to complete this, partly due to it always being easier doing something the second time. This HTML5 version uses localStorage a lot to store the test modules and various other bits of data. It’s probably not something that I would actually release as currently it stores too much data in localStorage, but I built it in such a way that I can build plug-ins that work on different devices meaning that I only need to recreate the device specific code for storing and retrieving data and the rest of the code that handles the interface should be the same.
Once I got the HTML5 version done I had to begin on the Android app. The app is very basic with a WebView (a WebKit control) taking up the whole screen. I then load the HTML5 app inside there and leave it do the rest. To provide the device specific code I’ve created a Java class with methods that match the plugin interface. I then add an instance of that class to the WebView using addJavascriptInterface. In theory I thought that would be all I’d need to do to get it working, due to a few idiosyncrasies of
addJavascriptInterfacethat wasn’t the case, as I’ll explain in the following few paragraphs.The first issue I found was that the object that is exposed in the JavaScript appears not to act like a normal JavaScript object. The way I had my code arranged there was a global singleton
ExamsTutorobject and then the plugin would be another singleton calledExamsTutorDevicePlugin. To save having to decide which object’s methods to call,ExamsTutorwould copy all the functions from the plugin into itself, as follows:for( var key in device ) { obj[key] = device[key]; }In that example I’ve already assigned
ExamsTutorDevicePlugintodeviceandobjis going to be theExamsTutorsingleton.After that code I would expect a call like
ExamsTutor.someDeviceSpecificMethodto work. Unfortunately I found it wasn’t and when I added some logging statements it turned out that the code was never going into the loop. In the end I decided to add a JavaScript singleton that would wrap the Android object, a little annoying that I need to do this but as you’ll see it ended up being useful later, here’s a snippet from that class:var ExamsTutorDevicePlugin = (function() { var a = ExamsTutorAndroidPlugin; return { log: function(message) { a.log(message); }, requiresInitialPathway: function() { return a.requiresInitialPathway(); }, showPathwayDialog: function() { a.showPathwayDialog() }, currentPage: function(page) { return a.currentPage(page) }, ...The next issue was the types that could be sent to and returned from the android interface. In my plugin interface I had already arranged to send various JavaScript Objects and Arrays in and out of the functions. After some testing I found that
addJavascriptInterfaceonly allows basic data types such as boolean, int and String. Fortunately this is simple enough to fix. I’m already using jQuery inside my web app and have the JSON plugin so I can use$.parseJSONand$.toJSONto make sure that I only pass strings to and from the Java. I was worried that this would result in me having to do lots of packing and unpacking on both sides of the interface but actually on the Java side I will generally just be storing the JSON to files so it shouldn’t be much of an issue. Another snippet from my JavaScript singleton with this in place would be:defaultPathway: function() { return parseJSON(String(a.defaultPathway())) }, setDefaultPathway: function(pathway) { a.setDefaultPathway($.toJSON(pathway)) },You might notice in that snippet that I’ve used
parseJSONrather than$.parseJSON. This was due to the final issue I’m going to describe here. For some reason the string objects returned by the Android interface don’t seem to react to thetypeofoperator in the way I might expect, and in the way jQuery’sparseJSONmethod was expecting. The first thing that$.parseJSONdoes before parsing is some sanity checking to make sure it has a string:if ( typeof data !== "string" || !data ) { return null; }For some reason, calling
typeofon the strings returned by Android was giving"object"and so this check was failing and jQuery was giving up on the parse. Fortunately this was simple enough to handle. I added a local parseJSON method to coerce the json to a string and also to handle the exception that might be fired by jQuery:function parseJSON(json) { var data = null; try { data = $.parseJSON(json); } catch(e) { data = null; } return data; }With that I managed to get the app to the point where I can select a Revision Pathway and have it download the information for that pathway and download the test modules from the Internet. There’s still plenty more to be done but as you’ll see from the screenshots it’s not looking bad already.
-
47 Live Apps, Week 122
Last week I mentioned that we’d got the examstutor.com apps finished and submitted. This week they went live. Apple approved them all on Tuesday evening at which point they moved into the “Processing for App Store” state. Unfortunately it then took about 24 hours for all the apps to get through this stage as 6 of them ended up sitting there for ages. We finally got everything sorted out and put the apps live on Wednesday night. The apps have started selling straight away which is a great relief though not a huge surprise as the old apps were still selling ok. This is the first time in a while that I’ve had a free app on the store that I really care about the sales of so it’s interesting to see how the “Login” versions are doing. Currently they’re “outselling” the paid-for apps by way over 10 times but this isn’t a huge surprise. It’s good to see that people are interested though and hopefully some of those will convert to sales. Examstutor.com is now featuring the apps on the homepage and has a good set of pages describing the apps so it’s no surprise to learn that existing subscribers are already downloading the free apps and logging into them. If you want to see more information then take a look at the iPhone apps section on Examstutor.com
Getting these 18 apps live actually took me to 47 separate apps live on the app store, which I like to think - even if some of the apps are just different content - is a pretty good number. Because the Examstutor.com apps are intended to replace the old “Revise” apps I have now taken the A-level versions of those down but I’m still at 36 live apps. 17 of my own (3 not available in the UK), 18 examstutor.com apps and one Credit Cards app I did for Moneyextra.com. Many of these may be repeated but if we ignore the repetitions that’s 5 different apps I’ve got live on the store now and 3 others that are completed but waiting to go live for various reasons. Quite happy with my portfolio and hope I get to continue building interesting apps in the new year.
A quick update on my clock. I ended up deciding to bolt the motor onto the mechanism rather than using glue again. After various problems including broken drill bits I managed to get it secured and turning nicely. Unfortunately when I tried to get it working with the software it stopped working again. I’m now not sure if there’s a problem with my circuit board or somehow there’s a new problem in the software. I’ve had to leave it alone for a while though as I have other things to work on but hopefully I’ll get it going eventually.
I’ve also been working on a brand new start-up idea that someone came to me with a few months ago. I’ll be doing the bulk of the technical work including a Ruby on Rails back-end and supporting mobile apps. I can’t really go into too much detail about it right now but it’s hopefully going to be an interesting return to the location space for me. Watch this space for more info as things progress on that.
-
Apps and Clocks - Week 121 (& 120 & 119)
 So these weeknotes are rapidly, or rather slowly, becoming “monthnotes”. The past few weeks have seen a few interesting things happen though so I thought I’d get another post up. Last week saw the completion of version 1.0 of the Examstutor iPhone apps. We managed to get the content for all of the 9 subjects we were hoping to support finished and so submitted 18 apps! We’re now just waiting to see what Apple will say, hopefully they’ll go straight through without any rejections but you can never be too sure. We’re submitting two apps per subject. One is quite simply a paid-for app, you pay your money and you get access to hundreds of questions on your subject. The other will be a free app in the store but is intended to be used by schools and colleges (and, in fact, individuals) who have signed up with examstutor.com for use of their online and mobile service. On downloading the free app they will be prompted for a username and password, when they enter this they will get full access to all the content “free”. We’ve included a few tests (generally around 20 questions) for people to use on the free app though so that if they download it by accident they still get to try it out and can then decide to upgrade if they want.
Last week I also managed to get the final few issues sorted out with my chess app, it’s looking better and hopefully I’ll be able to submit to the store pretty soon.
I also got most of the work done adding features to the Ruby on Rails site I mentioned in my last blog post. I needed to generate PDF invoices for a selection of addresses and services in the database and managed to get the work done pretty quickly. This was the whole point of converting from the awful PHP to a new codebase but I was still surprised by how quickly I got it done. I mainly need to make some changes to the PDF document to better match what the client wants and then let them try the system out and see what they think. I’ve used Prawn for the PDF generation and have been quite happy with it finding it pretty easy to use.
Final thing to mention is my location clock that has been quite popular on this blog previously. I originally built it at Howduino Liverpool in May 2009 - around 18 months ago. It has sat around with barely any updates since then and so was still made up of a big messy bundle of wires.

With the second Liverpool Howduino event coming up I decided I really had to get around to soldering this up, and I wanted to get it done before the event so that I could play with something else on the day (Xbee modules, lasers and a second four handed clock powered by servos were all on my list). Leaving it to the last minute I finally got started on building a circuit board on Thursday and did manage to get it finished off on Friday. Unfortunately I had a few issues with it, various connections connected that shouldn’t have been, and others that should have been were not. I then found that for some reason the software that had been working fine before had stopped working too. Fortunately I finally managed to get it all working on Saturday so now have a fully working circuit board and software.

So why am I not happy now? When I came into the office this morning I picked up the clock and started looking to see if I could get a chime to fit in the casing and where would be best to fit the arduino and cut holes for the ethernet, USB and power ports. I brushed past the motor and it wobbled, I thought “hmm, that seemed loose…. OMG, THAT’S LOOSE!!” After something like a year of being firmly stuck on by Araldite the stepper motor has now detached itself from the mechanism so my clock is still not working. I’m going to go out at lunchtime and see what glue I can find that might be able to stick a metal motor onto a brass mechanism, or possibly try to think of an alternative!


subscribe via RSS or via JSON Feed