YAHMS: Base Station
Bit of a delay as I’ve been busy with other things but in this post I’ll be completing the set of YAHMS hardware by discussing the base station hardware and software. The base station has a few jobs to do in my YAHMS setup:
-
Physically connect to the relays via digital output pins.
-
Download the config for digital output pins and then control them.
-
Receive the XBee signals from the temperature probes.
-
Take samples from an on-board temperature sensor.
-
Submit samples received locally and via XBee to the server.
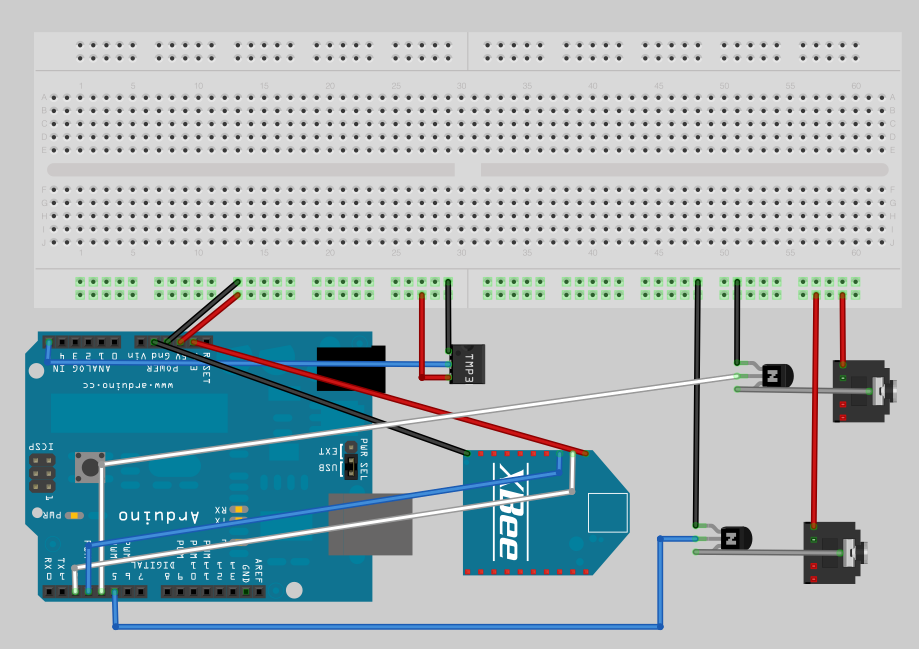
The circuit for this is fairly simple though, just connecting up some inputs and outputs. I mentioned connecting an XBee to an Arduino in the temperature probes post, we simply need to connect the DIN and DOUT pins up to the Arduino so that it can receive the information (and of course the power and ground wires). Because I like to use the main serial interface on the Arduino for outputting debug information back to the computer I’ve gone with connecting to pins 2 & 3 and using the NewSoftSerial which essentially means the serial interface will be provided by software. This isn’t ideal as in theory it means you’re more likely to miss data as it comes in, but the latest software serial drivers largely get around that issue by being interrupt driven. So I end up with the XBee power and ground going directly to one of the grounds on the Arduino board and the regulated 3.3V output, and then pin 2 (DOUT) on the Xbee is plugged into pin 2 on the Arduino and pin 3 (DIN) goes to pin 3 on the Arduino.
I have two NPN transistors turning on the relays (using transistors so that the magnet in a coil relay won’t cause a burst of current draw to the Arduino digital pin) which are plugged into two 3.5mm audio jacks. I have 5VDC power going onto the tip of the headphone jack, the sleeve connection of the jack then goes to the collector on the transistor and the emitter of the transistor completes the circuit by connecting to ground. The base of the two transistors go to pins 4 and 5 respectively on the Arduino.
I also decided to add a temperature sensor onto the board just because I had lots handy and to make sure that I had something to sample locally. The TMP36 is wired to the 5V power supply and then the VOUT goes to A5 on the Arduino to sample the temperature. See my temperature probe post for more details on TMP36s.
Here’s a picture of my original circuit diagram:

And here’s a fritzing version of that diagram:
And here’s a photo of the finished product:
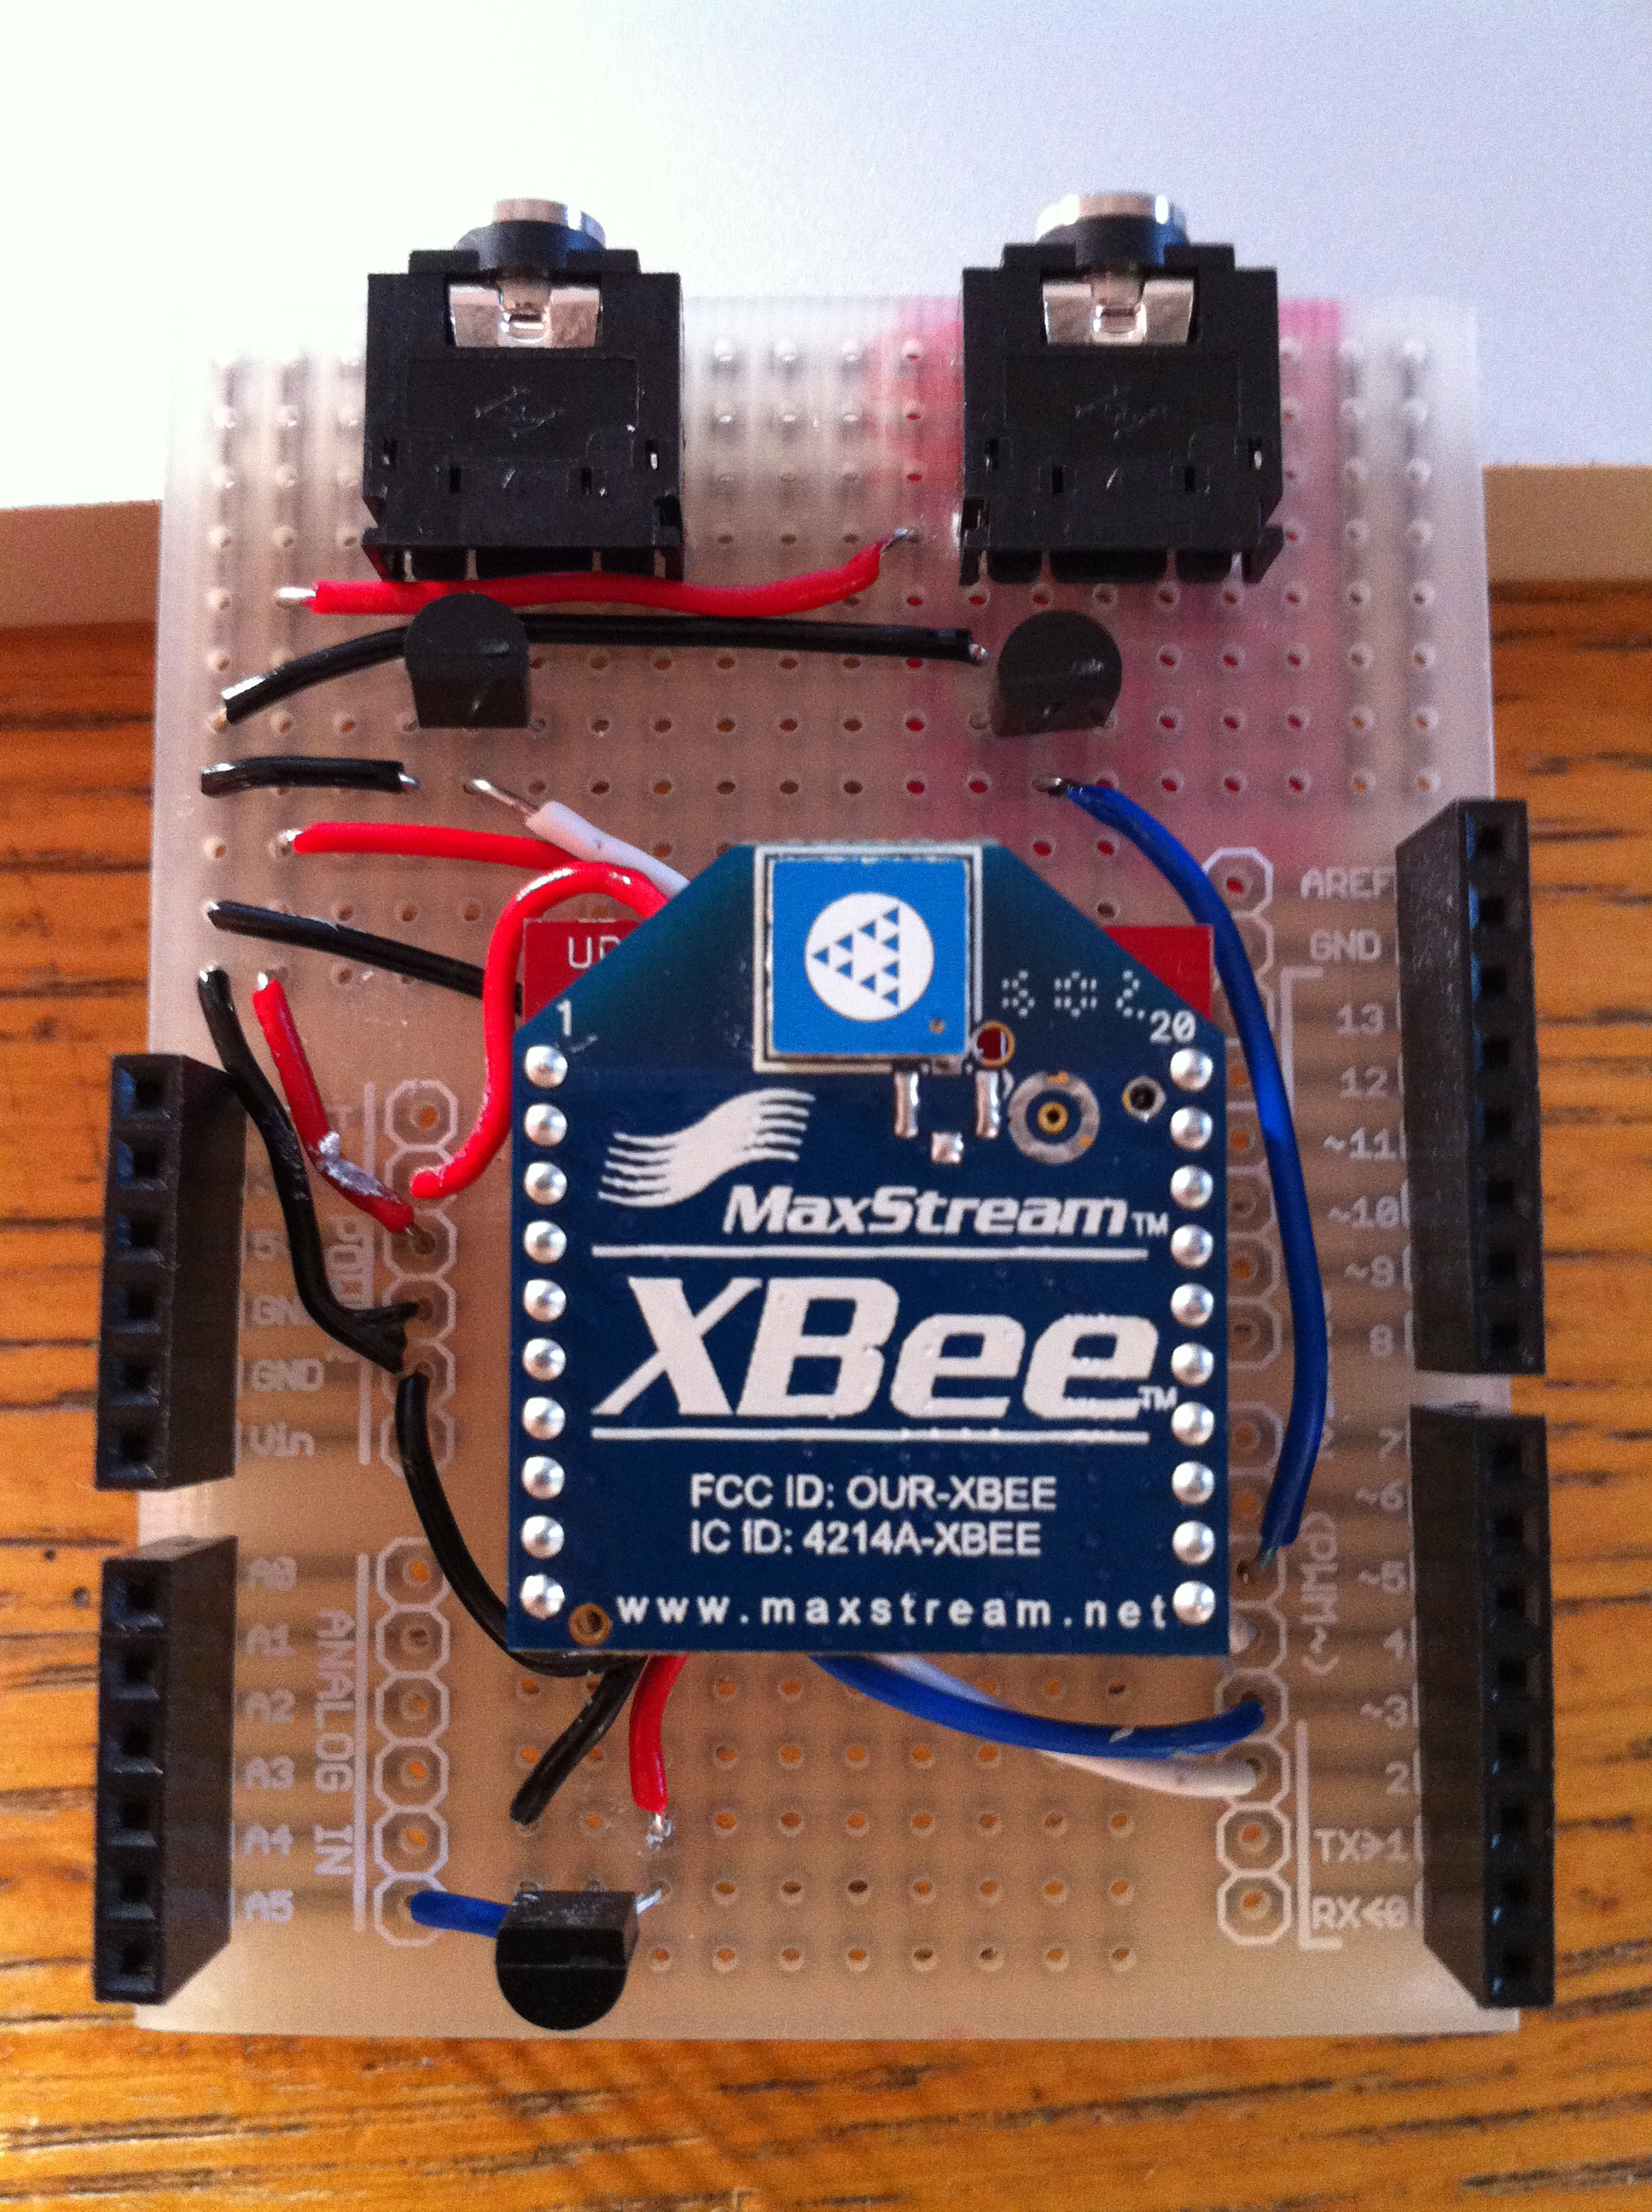 The board I’ve used here is a prototyping shield that I got from @oomlout at MakerFaire. Being a shield it’s really handy and has two sets of connected track on the ends allowing power distribution. I couldn’t find a part for it in Fritzing so I’ve just used the breadboard piece and tried to arrange the parts in the diagram in a similar way to how they ended up, but with more useful spacing.
I had a few small physical problems with the board when it was completed. The pins on the headers on the prototyping shield are note long enough for it to properly stand above the RJ45 jack on an ethernet shield. You can kind-of push it down so that all the contacts are made but it’s not quite ideal. This also means that the RJ45 shielding will short circuit any connections it’s butting against on the prototyping board. That caused a bit of a debugging nightmare for me at first until I realised and applied some insulation tape! Things fit well if you put the ethernet shield on top of the prototyping shield but unfortunately the ethernet shield then didn’t work, I assume because it needs the ICSP connection.
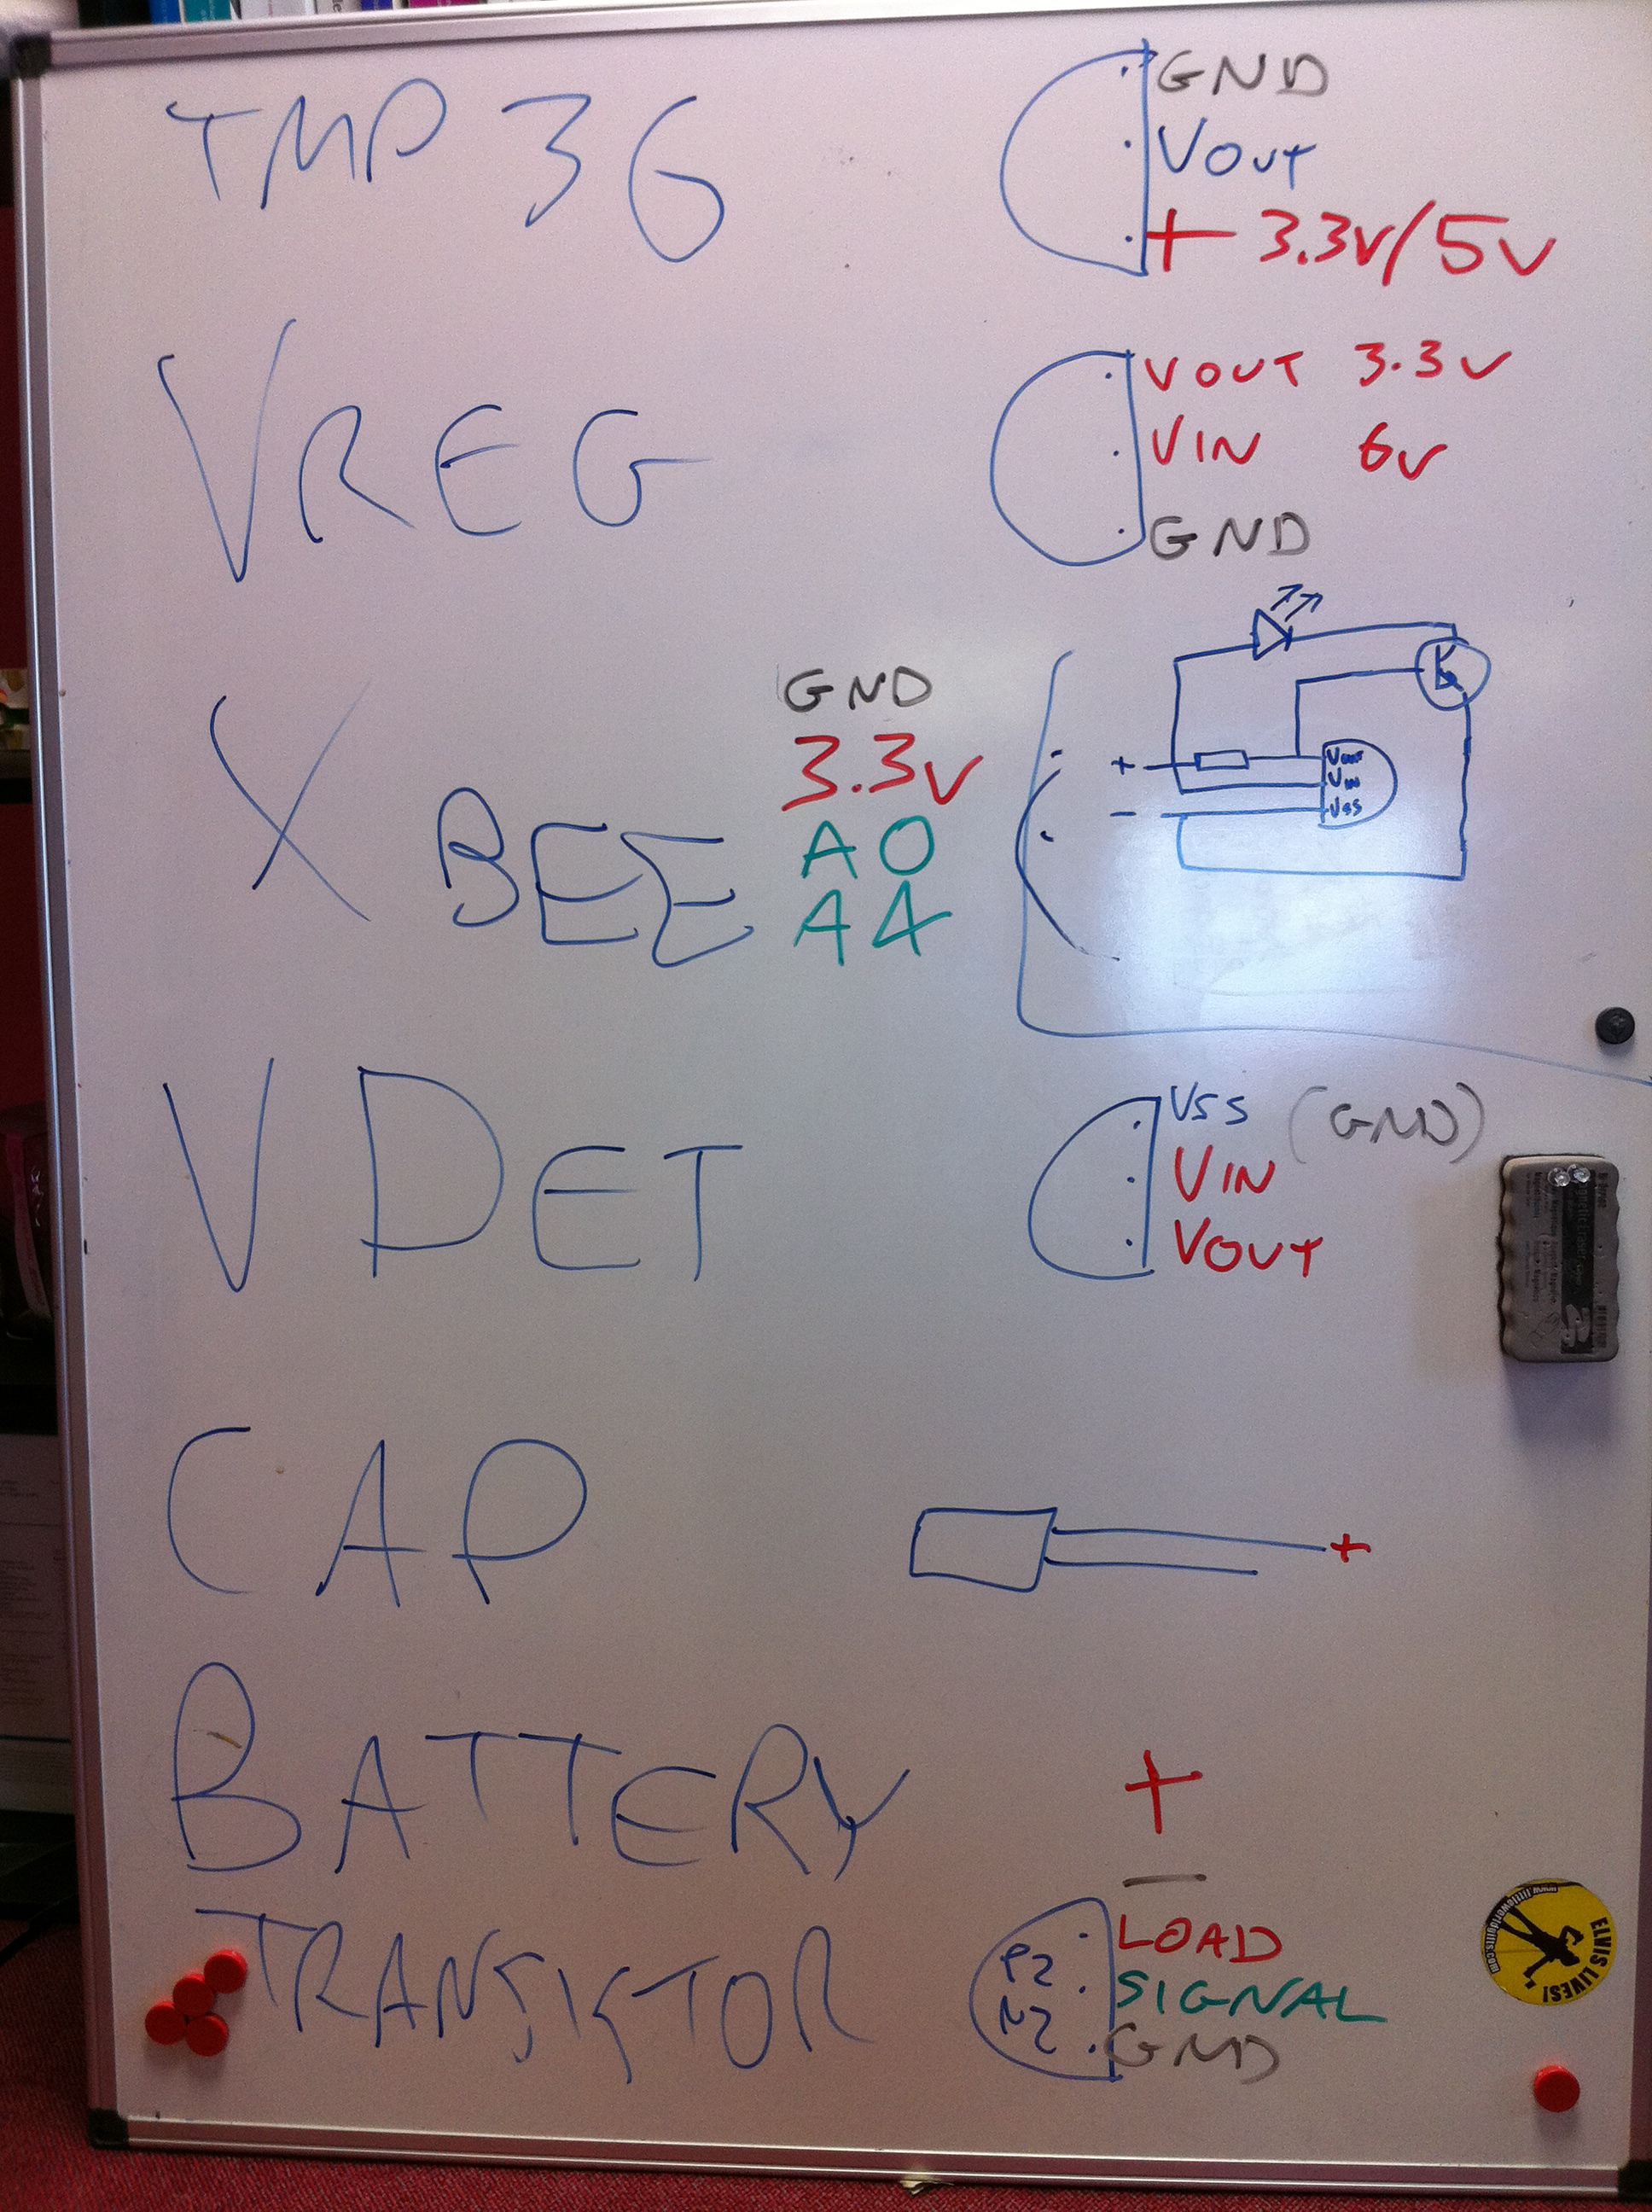
The hardware here is pretty simple but I’ll do a parts list as usual for completeness. Thought I’d also include this cheatsheet which I drew on the second whiteboard in our office:
It’s worth noting that as YAHMS is completely configurable you can actually have whatever circuit you want using any of the digital output pins or Analog input pins, and choosing whether to use the XBee or not, my circuit is only really shown as a guide. In the future I intend to add support for digital inputs too.
Once that was all done it was time to write some software. As I mentioned in the first post I’ve actually open sourced the software for this so you can grab the source code for YAHMS from github and extend and fork it as much as you want. Unfortunately at the moment it has a few non-standard dependencies. The main thing is the new version of the Ethernet libraries that Adrian McEwen (@amcewen) has been working on. These will be part of an Arduino build in the near future but for now you can try getting them from his github fork of the Arduino environment. They’re really useful though as they provide DHCP and DNS support meaning no more fixed IP addresses! I’m also using a HttpClient library that Adrian has also written. This isn’t actually available properly from anywhere yet (but keep an eye on his github repositories!) so I’ve linked to a zip file of the version I’ve used below, that also contains a few other libraries that it uses. The final custom library is a version of this XBee Arduino library that I’ve hacked to support NewSoftSerial instead of just the standard Serial interface, see the links below for that too. You’ll also need NewSoftSerial of course and the Flash library which I’ve used to decrease memory usage. Follow the instructions in patching_print.txt to patch the system Print library to support the Flash objects.
If you manage to get through the rather complicated compilation process for YAHMS you’ll find that you just need to edit the MAC address in YAHMS_Local.h and you’re ready to go. In theory you should not have to configure anything else locally once I have yahms.net working fully. Once running on an Arduino that sketch will retrieve an IP address via DHCP, synchronise the time using NTP and will then attempt to retrieve the latest config for the MAC address from yahms.net yahms.johnmckerrell.com (yahms.net does work but seems I’ve forgotten to update the source code). Currently there’s no way for you to put your config into yahms.net but hopefully I’ll get that up soon enough. Until that point you can edit YAHMS_SERVER in YAHMS_defines.h and use something on your own system.
Config is requested by a HTTP GET request to a URL like the following:
http://yahms.net/api/c/a1b2c3d4e5f6/1/00000000
Which breaks down as follows:
| /api/c/ | a1b2c3d4e5f6 | / | 1 | / | 00000000 |
| MAC address of your ethernet shield, as registered with yahms.net | Protocol version, currently ignored | Time last update was retrieved, idea being that the server will return nothing if the config has not updated, also ignored and incorrectly sent as zeroes by the YAHMS code right now | |||
And should return something like this:
YAHMS
A:5
O:4,5
X:2,3
C:30 6 * * * 60 4
C:0 7 * * 8 120 4
C:30 19 * * * 60 4
C:40 16 13 4 * 60 4
C:2 8 6 5 * 60 4
S:60
Which breaks down as:
| YAHMS | _header, identifies this as YAHMS config_ | ||||||||||
| A: | 5 | _comma separated list of analog pins to take samples from_ | |||||||||
| O: | 4,5 | _comma separated list of digital pins to use for output, controlled by control blocks given later_ | |||||||||
| X: | 2,3 | _Pins being used for Xbee as RX then TX_ | |||||||||
| S: | 60 | _comma separated list of settings, the first number is a number of minutes that this system is offset from GMT - the server is expected to handle daylight savings time and change this accordingly_ | |||||||||
| _and a set of control blocks_ | |||||||||||
| C: | 30 | 6 | * | * | * | 60 | 4 | ||||
| _pin 4 turned on at 6:30am every morning for 60 minutes_ | |||||||||||
| C: | 0 | 7 | * | * | 8 | 120 | 4 | ||||
| _pin 4 turned on at 7am at weekends for 120 minutes_ | |||||||||||
| C: | 30 | 19 | * | * | * | 60 | 4 | ||||
| _pin 4 turned on at 7:30pm every evening for 60 minutes_ | |||||||||||
| C: | 0 | * | * | * | 2 | 10 | 5 | ||||
| _pin 5 turned on for 10 minutes every hour, every Monday_ | |||||||||||
| C: | 0 | 14 | * | * | 2 | 10 | 5 | 0 | |||
| _pin 5 turned **off** for 10 minutes at 2:00pm on Mondays, i.e. cancelling out the block on the previous line_ | |||||||||||
The syntax for the control blocks is inspired by the syntax of crontab although YAHMS only supports either a number or an asterisk (*) for the numbers, and instead of a command the time is followed by a number of minutes, a pin that you want updating and the state you want it to have. An asterisk in a numeric column means that this column always matches, a number means “only use this block when this field has this value”. Here’s a breakdown of the fields:
| Field | Example | Description |
|---|---|---|
| C: | Identifies this as a control block | |
| m | 30 | number of minutes past the hour (0-59) |
| h | 6 | hours since midnight (0-23) |
| dom | 3 | day of the month (1-31) |
| mon | 5 | month of the year (1-12) |
| dow | 2 | day of the week (Sunday is 1, 8 is weekend, 9 is weekday) |
| len | 45 | length of time the block is active, in minutes (stored as an int so -32,768 to 32,767 though it would be unlikely you’d use values that big) |
| pin | 4 | the arduino digital pin that you would like to control |
| state | 0 | This field is optional and is “on” by default, 1 is on, 0 (zero) is off. |
So this would give us a very specific control block that turns pin 4 off for 45 minutes from 6:30am on the 3rd of May, but only if that day happened to be a Monday.
At any point in time it would be possible for a number of control blocks to be active for a pin. If any of these blocks specify that the pin should be off then this gets priority and the pin is turned off. The default state for a pin when no control blocks are active is also off. Generally you would only need to have “on” control blocks but the “off” blocks allow you to override, so you can have a block that turns the heating on every evening, but add a temporary “off” block to turn it off on a particularly warm evening.
For sampling, the YAHMS system will take a sample from any analog pins that you have requested on every cycle of the loop method. It will store the last 10 samples and then submit a smoothed value back to the server. For the XBee values it will check every cycle for an XBee packet (waiting for 5 seconds). If it receives a packet it will record a smoothed value from the samples that have been sent. Every minute the system will submit any samples that it has taken, and will then blank the XBee records. This way you won’t get continuous records from the XBee if it stops transmitting. The samples will be sent to the following URL as a HTTP POST:
http://yahms.net/api/s/a1b2c3d4e5f6/1(Again that’s the MAC address and a version number in the URL)
The POST data is sent as Content-Type: application/x-www-form-urlencoded and will have a format similar to the following:
A5=0b8&X1P0;=226&X1P1;=039&X1P2;=05f&X2P0;=233&X2P1;=18f&X2P2;=18f&X2P4;=0de&Each sample is a three digit hex number (three digits is required to send to 10 bit accuracy). The samples from Arduino analog pins will have keys of A0-A5 and samples from an XBee are given as X, then the ID of the unit (the Arduino code will only support single digit IDs at the moment, i.e. 0001-0009 are supported), then the letter P then the XBee Analog/Digital pin that was sampled. So in the above we have a value of 184 from Arduino analog pin 5, then 550 from pin AD0 (pin 20 on the module) of the XBee with ID 0001, we have some more values and end with 222 from pin AD4 (pin 11 on the module) of the XBee with ID 0002.
The code for yahms.net currently requires Rails 2 but I’m thinking that I should update it to work with Rails 3 considering that’s been out for ages. I’m intending to do this update before releasing the code. If anyone particularly wants a copy then let me know and if lots of people do I’ll just release it anyway. For now I’ve linked to a small PHP script below which you can use to send config to your YAHMS system and store the submitted data in a text file. Below are the links to the other custom libraries too:
Do let me know if you find this interesting or useful! I really hope someone does and the more feedback I get the quicker I’ll release the yahms.net code and improve the whole system!
Comments
— Blog What I Made » YAHMS: Revisited, Upgrading to XBee with Wire Antenna