YAHMS: Revisited, Upgrading to XBee with Wire Antenna
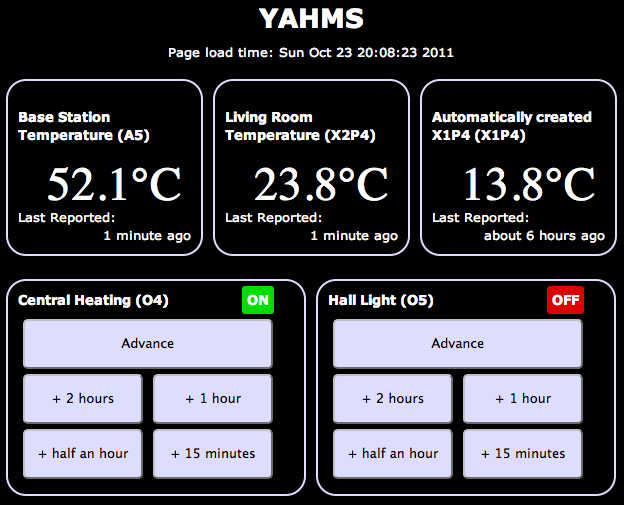
A good few months ago I blogged about my YAHMS project and my YAHMS Base Station. It was a funny time to get the project complete, just in time for the summer, but it has ended up being useful. Being able to turn the hall light on when we come home in the dark is really useful and, with the summer we’ve had, the heating has gone on from time to time too.
It hasn’t been without its problems, though fortunately they have been relatively few. Power ended up being an issue for the temperature probes, using four AA batteries would keep the probes running for about a week. This isn’t bad but would mean replacing them regularly, also when the voltage went low, the voltage detector didn’t seem to work and I would see rising temperatures. In the end I decided to use some wall wart power supplies, unfortunately that means the probes are less portable and also means that half of the circuit was unnecessary, as the wall warts never provide a low voltage.
I’ve also had problems with the Base Station falling off the network after around 5-7 days of use. There was originally a problem with the DHCP lease expiring so I made some changes to make it re-request the lease when it was near to expiring. This didn’t entirely fix the problem so to be sure I switched to a fixed IP. This led to the 5-7 day uptime, I’m not really sure what is happening here, I’m guessing some memory usage problem whereby there are not enough resources left to create a new Client object but I haven’t been able to track it down. When the problem occurs the system still manages to turn the heating on and off at the right times so it isn’t entirely useless, but it does become unresponsive to new settings and won’t send back data either.
Final problem, and the one I’m going to fix today, is that the XBee modules sometimes have issues transmitting data to the base station. I originally wanted to have one upstairs but couldn’t get that to work at all. I ended up putting that one in the conservatory to get “outside” temperatures but it still has issues quite often and has to be positioned right by the door to even sometimes work.
A few months ago I was approached by someone from Farnell who wanted to know if I would like to receive hardware to review on my blog. The arrangement is that they will send me hardware in exchange for a review on my blog and a link to the product on their website. So, here goes…
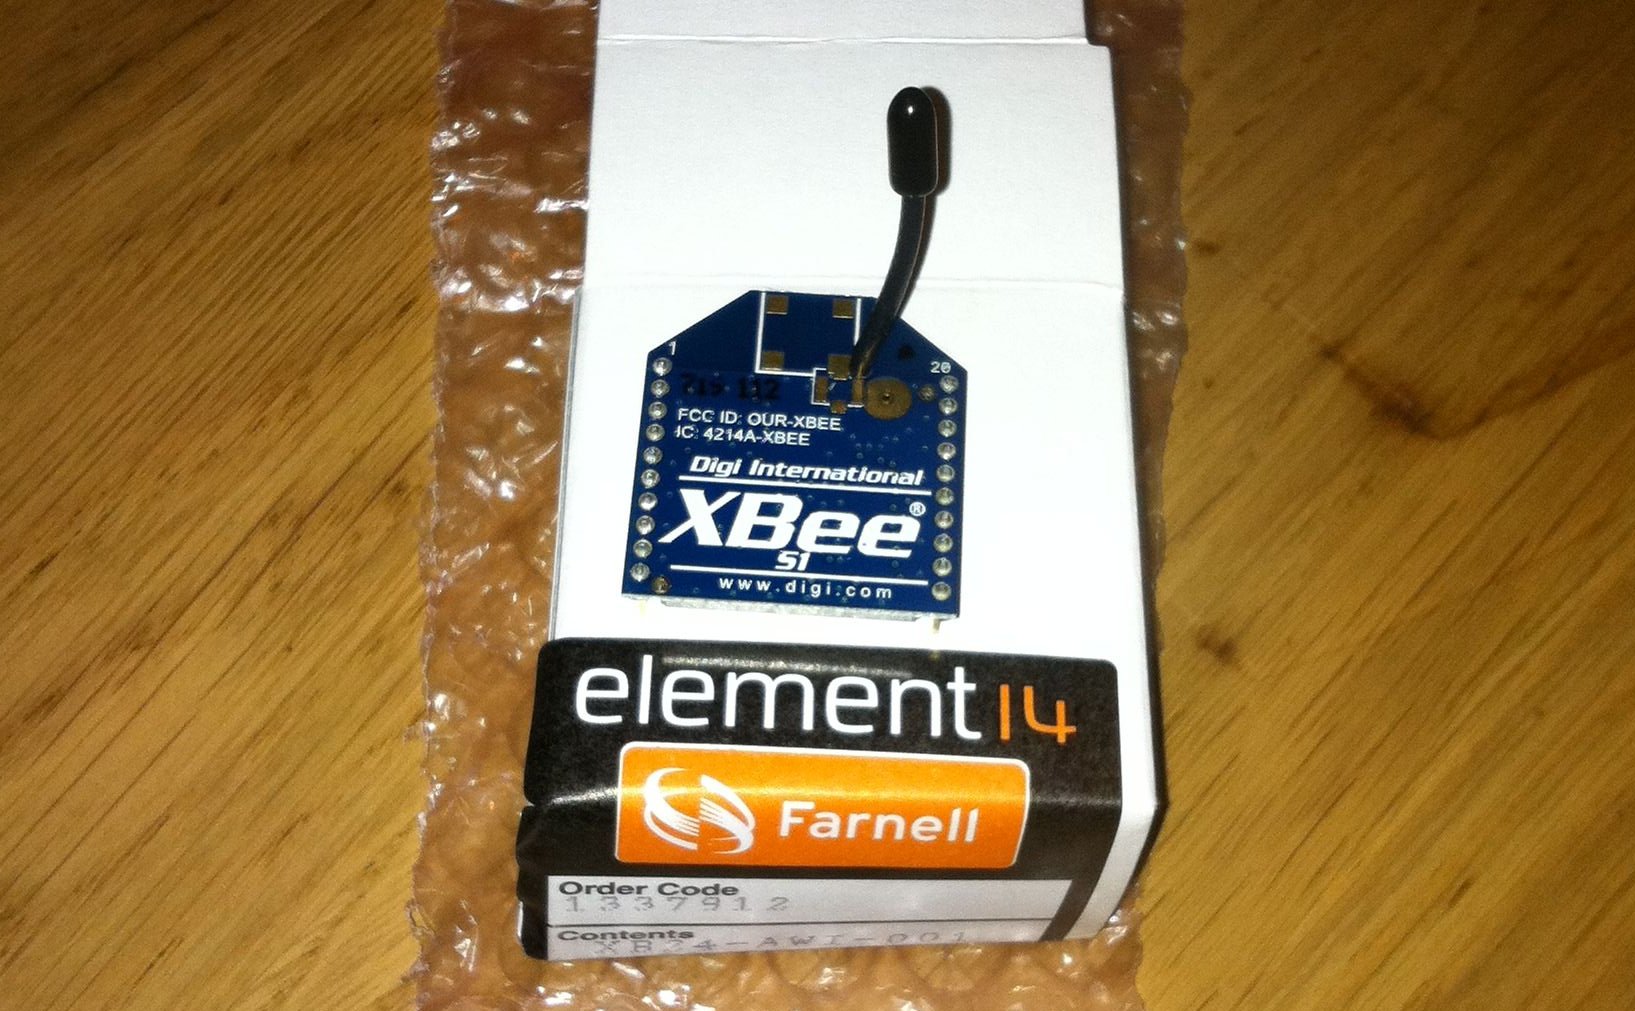
XBee Wire Antenna Module (Series 1)
Previously I’ve used the chip antenna versions of the XBee series one modules. These were great and really simple to work with but when I tried to use them in a network around my house I had real issues trying to get the signal to pass through walls and ceilings/floors. The best solution would likely be to replace all of the XBee modules with alternatives with better antennas or with more powerful radios. To replace all of the modules would be quite expensive so I’ve decided to go with replacing just the module on the base station and hope that it does a better job of receiving the signals sent out by the other modules. This may be foolish but I’ll give it a go and see what happens.
To replace the module should be a pretty simple job, it’s the same format as the chip antenna module so physically I just have to switch it out for the new one. Before I can do that though requires that I send some settings to the XBee to configure its ID and PAN ID as mentioned in my post about the temperature probes. To communicate with the Xbee I’m just going to use an Arduino Uno and wire the Din/Dout pins on the XBee to the RX/TX pins on the Arduino. I then load a blank sketch onto the Arduino and use the Serial Monitor to communicate with the XBee. What I’ll be sending to it is:
ATMY=0,ID=1234Which broken down means:
-
AT _ - Attention!_
-
MY=0, _ - the ID of this unit_
-
ID=1234, _ - the PAN ID for the network of XBees_
To send those settings open your Arduino software, choose the right serial port in Tools -> Serial Port then open the serial monitor with Tools -> Serial Monitor. Choose to send no line endings from the drop down at the bottom and send +++ then as quick as you can manage change to Carriage Return in the drop down first and send the above AT command. After the +++ you should see OK and after the AT command you should see OKOK.
You must also send an ATWR command too to write these settings to the flash memory.
Once I did that I started seeing random bits of binary data appearing in the Serial Monitor. Fortunately this was a good thing, it was the temperature data from my probes starting to show up!
I popped the newly configured module into my YAHMs hardware and waited to see if it worked…
As mentioned it was already receiving data so I started to see temperatures show up straight away. The conservatory probe was working straight away which seemed positive as it had issues before. When I took it upstairs it didn’t seem to work at first so I tried angling the box so that the chip antenna would be “pointing” at the base station. This seemed to do the trick and I started collecting temperature readings. Unfortunately as time has gone by I’ve found that it works less and less. I’ve now moved it closer to the base station which got me a few more readings but again it has stopped working. It looks like I’m gonna need a bigger boat aerial!
Hopefully I’m going to be able to try out an XBee with an external aerial which should work well on the base station, by this point I’ll have a few spare XBees, including one with a wire aerial so I should be able to get a much bigger range of readings.