YAHMS: Relays
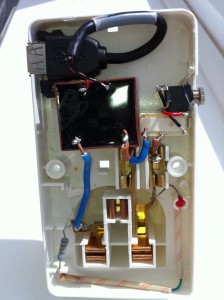
 This should be a fairly short post as the relays are quite simple. I decided to intercept the power to the heating by taking apart an old mechanical timer like these, stripping out all the mechanics and making use of the exposed connections which simply needed shorting to turn the socket on. With the mechanics removed there was plenty of space to fit the relay and the DC connector. I decided, for no particular reason, to use some 3.5mm headphone type jacks to handle turning the relays on and off. wiring it all up was fairly simple, the relay has 5 connections two for the DC connection and 3 for the AC connections, the AC ones are wired up differently depending on whether you want the AC circuit to be on or off when the DC signal is present. I also wired a diode across the DC connections on the relay as protection against any reverse current generated by the coil when the DC power is turned off. After reading the rating on the central heating system’s plug I went for (what I thought was) a 13A rated relay, when I opened the plug later on to rewire it though I found it only had a 3A fuse inside! At least my relay unit will be more capable if I want to use it elsewhere.
The place where my central heating plugs in actually has just two sockets. With this relay and the heating plugging into one that meant I only had one spare. I had already decided to use Powerline Ethernet to get network access to my boiler and so I didn’t actually have anywhere left to plug the Arduino in. I thought it would be a shame to have to load in an extension just for the sake of the Arduino so I began exploring other options. The first thing I looked at was tapping 5v from somewhere in the Powerline Ethernet device I was using, having taken it apart and looked up various of the ICs on the internet though I decided that probably wasn’t a good idea. I’m sure there’s somewhere I could’ve taken it from but considering the device was mostly about varying voltage and playing with everything from mains voltage to DC on the IC and a different level of DC over ethernet I decided to leave this one alone. I ended up looking on Farnell to see if they had any self contained switching PCB power supplies and with some searching help from Adrian McEwen again we found this 5VDC 2.75W switching PSU. I managed to fit this and an old USB socket into my old mechanical timer so that it was not only relay controlled but also provided 5V DC of power via USB, just the thing for an Arduino! The result is quite a nicely put together unit, the only problem being the black insulation tape I’m using to cover up the big circular hole where the mechanics were, I really ought to sort that out sometime. I quite liked the size and capability of the PSU though and may even get some more to power the XBee modules if the batteries don’t power them for long enough.
So, bill of materials for this unit are as follows, I’m not going to bother putting a circuit diagram in as it’s so simple but post comments if you have any questions.
| Mechanical timer | 1 | These are not the ones I used, just an example, so I can’t guarantee they’ll have the same amount of space, in fact they do look a bit smaller than mine. |
| 5VDC/250VAC PCB Relay | 1 | Data-sheet - I had thought this was 15A rated but looking again seems it might be only 6A |
| Diode | 1 | Not entirely sure what type of diode this was, just what Adrian had lying around |
| 3.5mm Jack | 1 | Data-sheet |
| 3.5mm Plug | 2 needed for this project (one either end of the connecting cable), this is a pack of ten though | Data-sheet |
| 5VDC 2.75W switching regulated PSU | 1 | Data-sheet |
| Female USB Type A socket | 1 | Just one I had lying around |
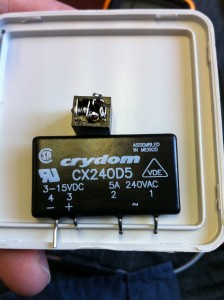
 For the light switch I went with this 5A solid state relay which I rejected for the central heating control when I thought I needed a 13A relay. Again it just required a simple circuit with a 3.5mm jack and a protection diode across. I’m housing all of this inside a thermoplastic junction box. it does the trick but probably isn’t ideal and has unsightly rubbery cones coming off each side which you can cut down to fit cables. Bill of parts for this one would be:
| Thermoplastic junction box | 1 | Not ideal but does the job |
| Solid state 3-15VDC/240VAC Relay | 1 | Data-sheet |
| Diode | 1 | Not entirely sure what type of diode this was, just what Adrian had lying around |
| 3.5mm Jack | 1 | Data-sheet |
| 3.5mm Plug | 2 needed for this project (one either end of the connecting cable), this is a pack of ten though | Data-sheet |
So next blog post should cover the base station, and that’s when thing start to get a bit more interesting.